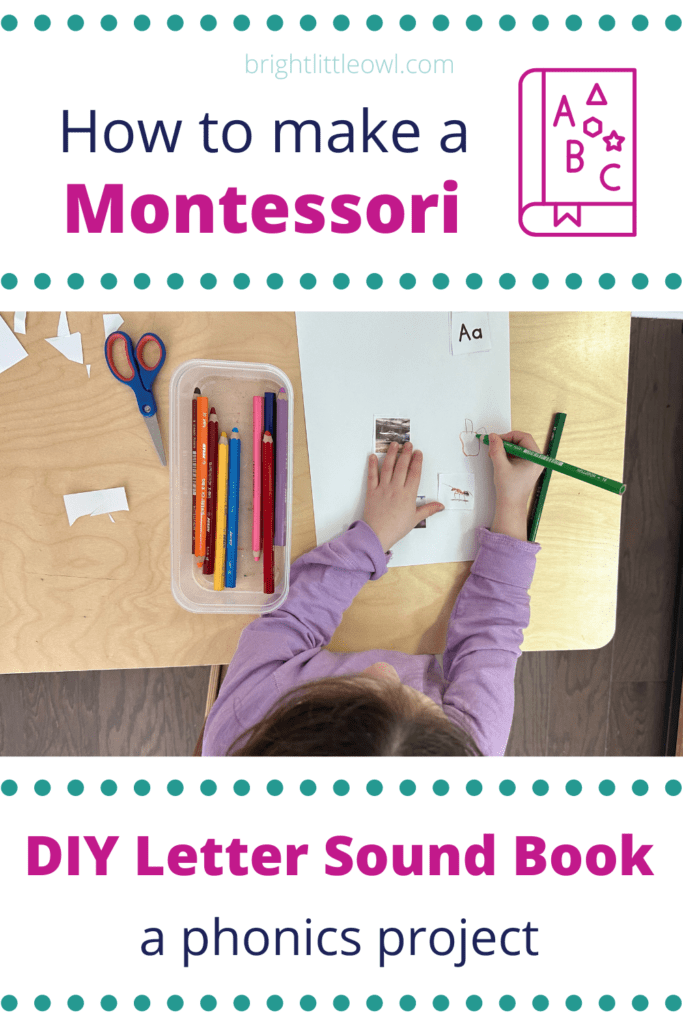
Montessori Letter Sound Book: keep track of sounds your child learned
In my previous blog post, Easy and Fun Beginning Sounds Game (Letter Object Matching), I share the sandpaper letter and object lesson with you. If your child loves playing this fun matching game, you’ll love creating a DIY letter sound book with your child!
Creating this book is an extension of the lesson, which means that it adds to the lesson by making it more challenging. It’s not required to make this book, and it’s not officially in the Montessori language album scope and sequence.
But, in my previous classroom teaching experience, I found the sound book to be a creative and exciting way for children to keep track of the sandpaper letter sounds they have learned already. It gives them a sense of ownership over their work.
It’s also a way for the adult to keep track of the sounds a child knows, so it helps with the task of record keeping and assessment.
In this post, I’ll share how to create your sound book with your child and how it went when I tried this with my 4-year-old daughter, Annie, at home!
In This Post
Why are phonics activities important for preschoolers?
Practicing phonics skills, like matching pictures or objects with the beginning letter sound and symbol, helps prepare young children to read.
According to the article by VeryWell Family, How Parents Can Help With Phonics Instruction:
"Phonics skills are important for children to be able to read fluently. Children who master phonics learn to recognize individual sounds and how to blend them together to read words."
The article says phonics instruction also benefits children with difficulty learning to read or those with learning disabilities.
The more you reiterate and explore letters, sounds, pictures, and language, the better young children will learn the skills necessary to decode and manipulate sounds within words.
Creating consistent phonics activities in the form of a sound book journal is a great project to prepare your child for reading.
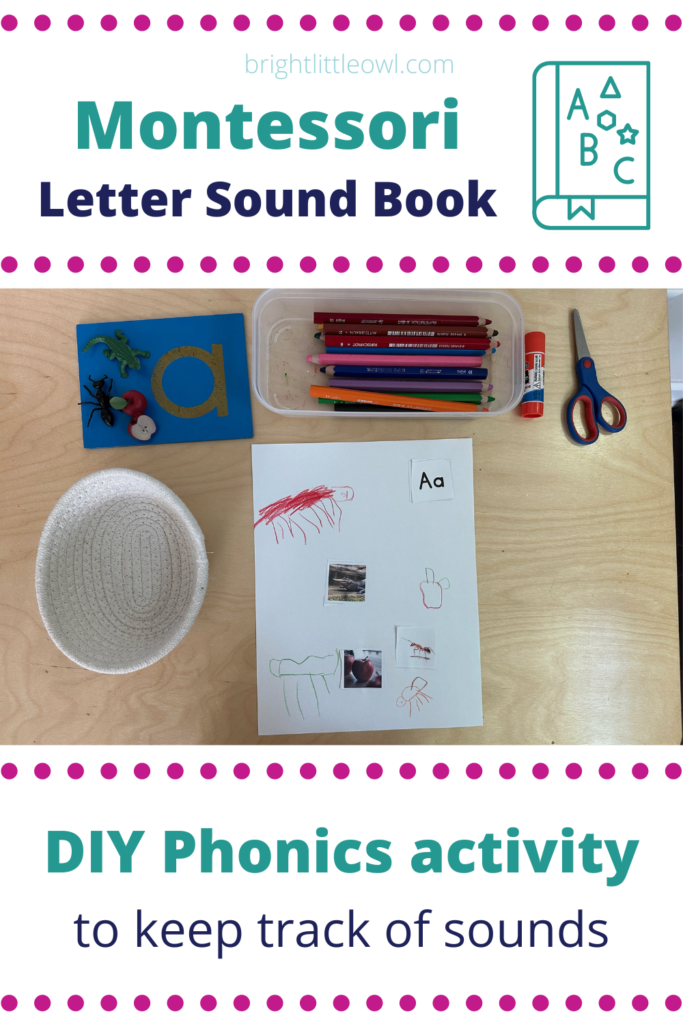
26 pieces of copy paper for the pages of the book (A-Z)
A cover for your book – a folder with three prongs for a 3-hole punch – or card stock or construction paper you could staple together
A stapler or 3-hole punch, depending on how you want to bind your book
Black marker for the adult to write the letters at the top right corner of each page
Colored pencils or crayons to draw pictures or color in pictures
scissors
glue stick
Collection of pictures (photos found online, photos that you take with a camera, pictures cut out of old magazines, books, or catalogs)
Optional: line drawing illustrations from coloring books or worksheets to color in
Optional: Lined paper to practice writing letters and writing name
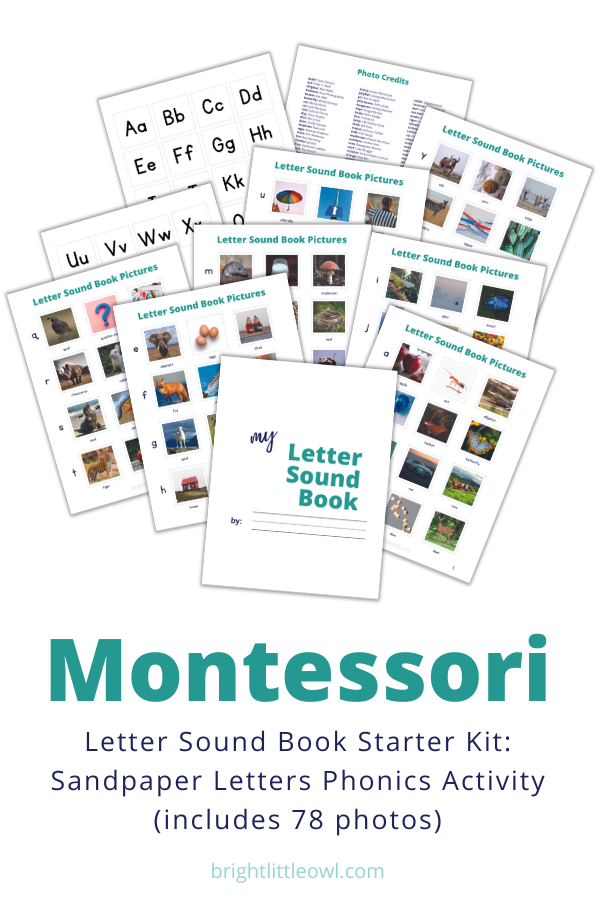
I created a DIY letter sound book starter kit. It contains 3 small photos for each letter (78 photos total), a cover, and page templates for A-Z. if you’d like to download it, sign up for the resource library at the bottom of this page. If you’re already a subscriber, use the updated password from my most recent email.
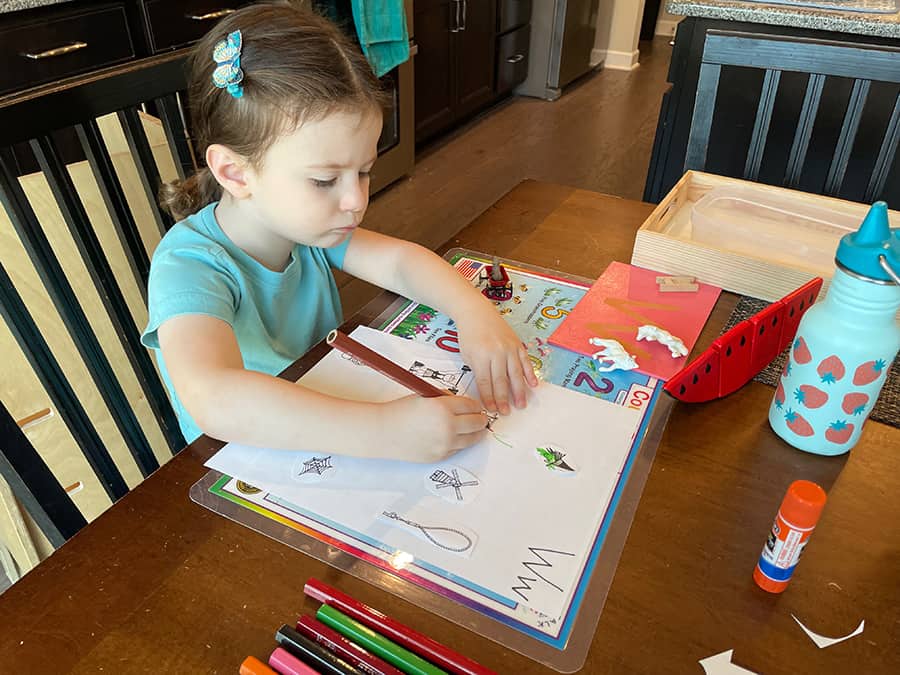
Step by Step: Create a page of your sound book
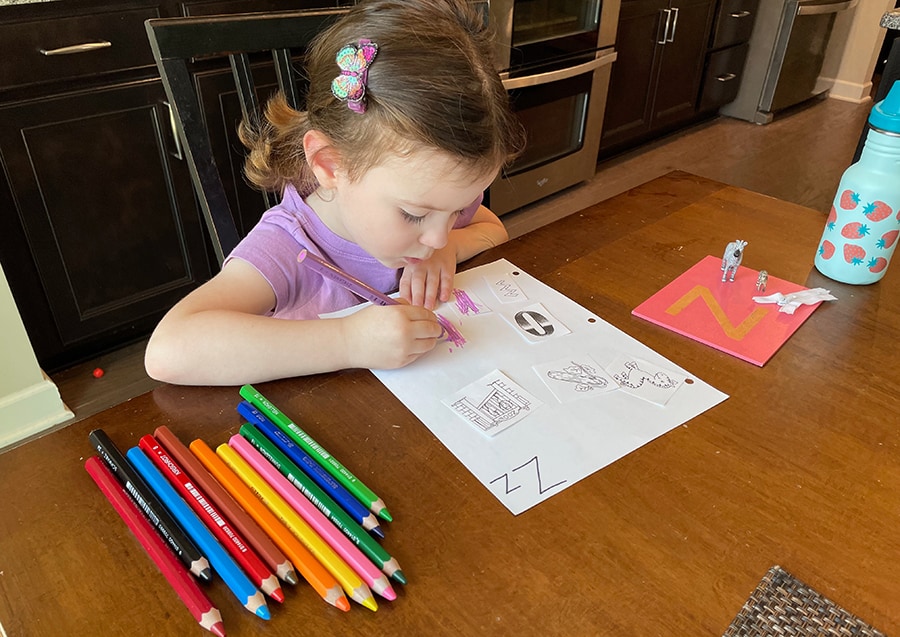
A new sound book page for the letter x
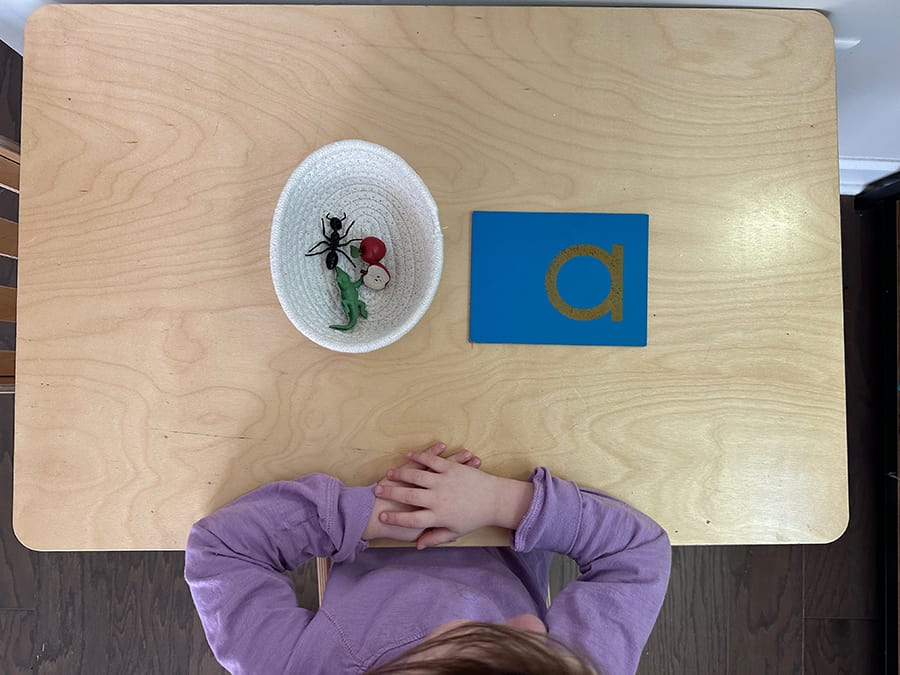
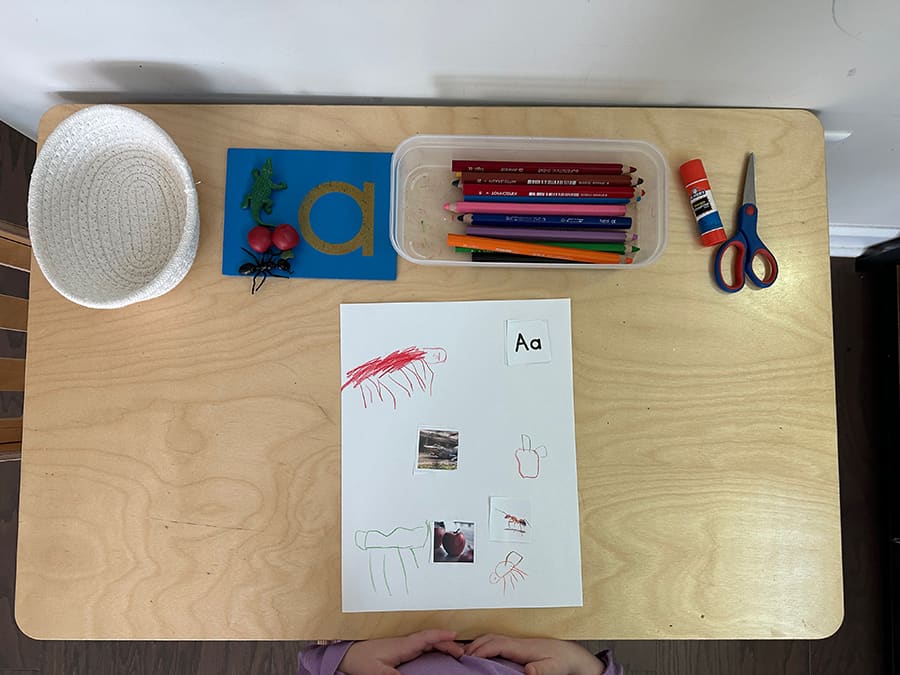
1. Choose a sandpaper letter and matching objects
choose a new sandpaper letter and matching objects
Your child can choose any sandpaper letter she would like, in any order. In Montessori, it is best for the child to choose a letter that calls to her in any order.
You could do the letters alphabetically if you’d prefer, and that’s okay. Do what works best for you and your child.
Once your child chooses the letter, gather a collection of objects that begin with that letter sound, and place them in a basket.
Bring the sandpaper letter and the basket of objects to the table.
Trace the letter first, then say the sound. Repeat. Ask your child to trace the letter and say the sound. Repeat.
Name the objects in the basket that begin with the letter sound and place the objects next to the sandpaper letter.
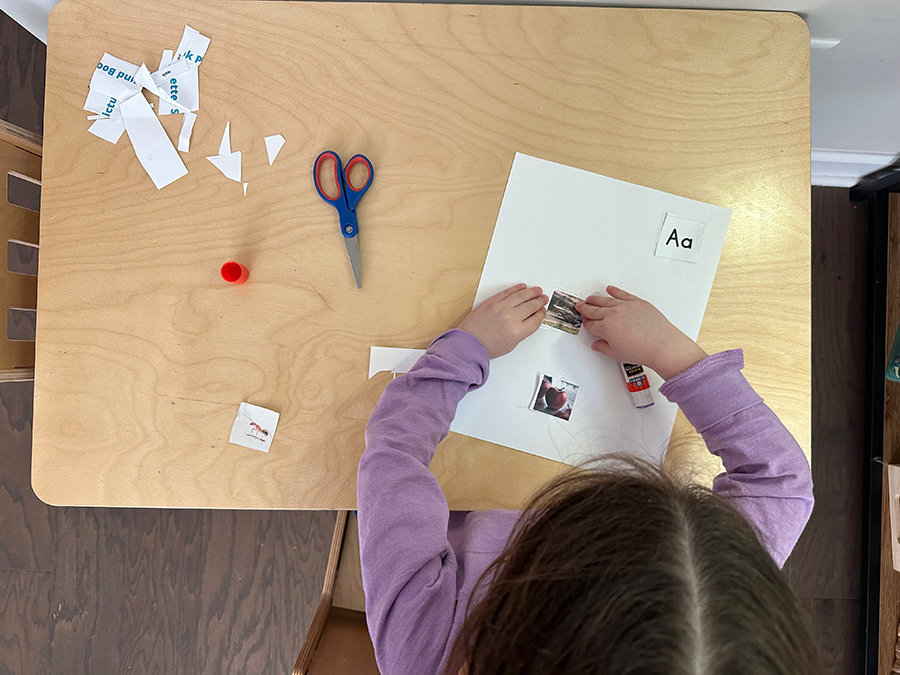
Get a new blank piece of copy paper, and with a black marker, you (the adult) write the capital letter and the lowercase letter together at the top right corner of the page. You could also cut out and glue the letters from my printable.
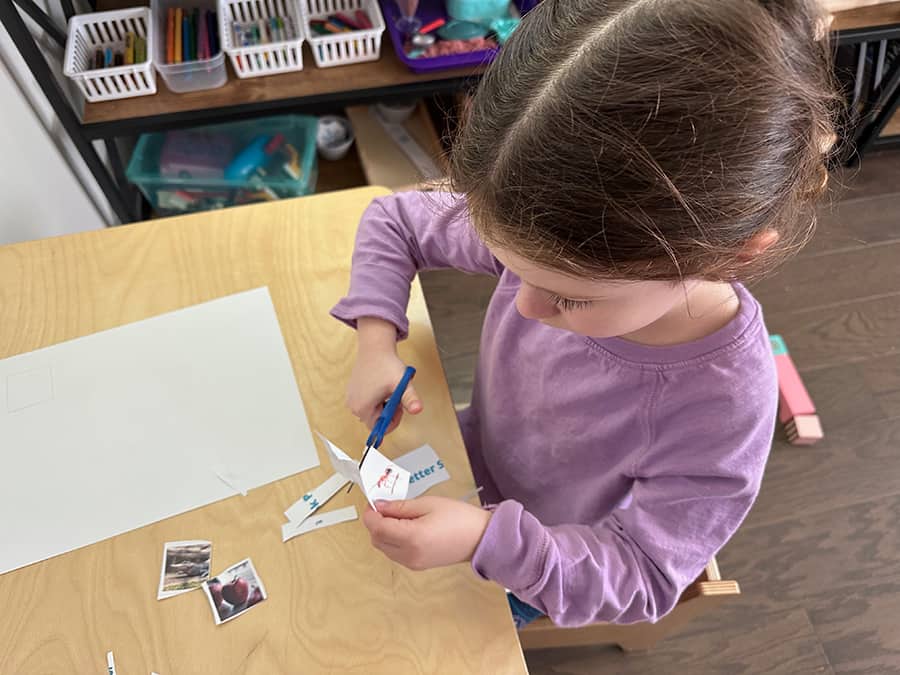
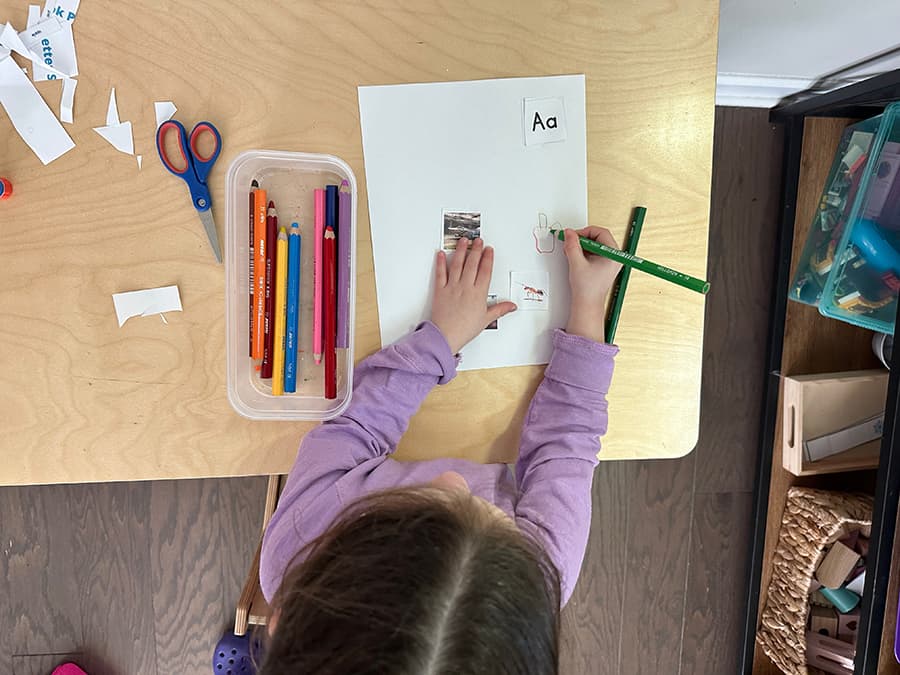
Show your child a collection of pictures that begin with that letter sound. Talk about the pictures and emphasize the beginning letter sounds.
As noted above, the pictures can be photos found online, photos you took with a camera, photos or illustrations cut out of old magazines, catalogs, or books.
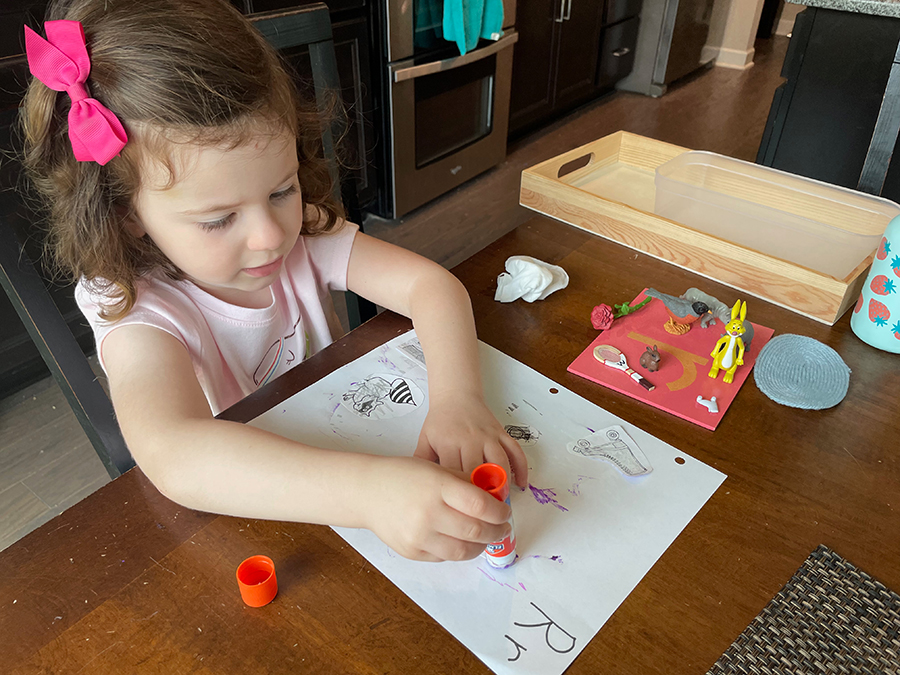
paste the pictures on your sound book page
Note: When we started this project, I used my collection of black-and-white line illustrations for Annie to color. These are old photocopies that I’ve had since I was a Montessori teacher. You could try to find line illustrations online or from coloring books or worksheets, too! (Only photographs are included in my printable.)
Personalize the letter sound activity for your child
I remember doing the letter sound book activity with some of the children in the Montessori classroom. Sometimes, children are not interested at all in coloring. They’d prefer to paste simple black-and-white illustrations or photos to their page. That’s okay.
For kids not interested or ready to color, you could take photographs of things around the house and print them out to paste on your paper.
You could cut out pictures from old books, magazines, and catalogs. You could print out photos and illustrations you find online. Ask your child to practice cutting out the pictures if she’s ready.
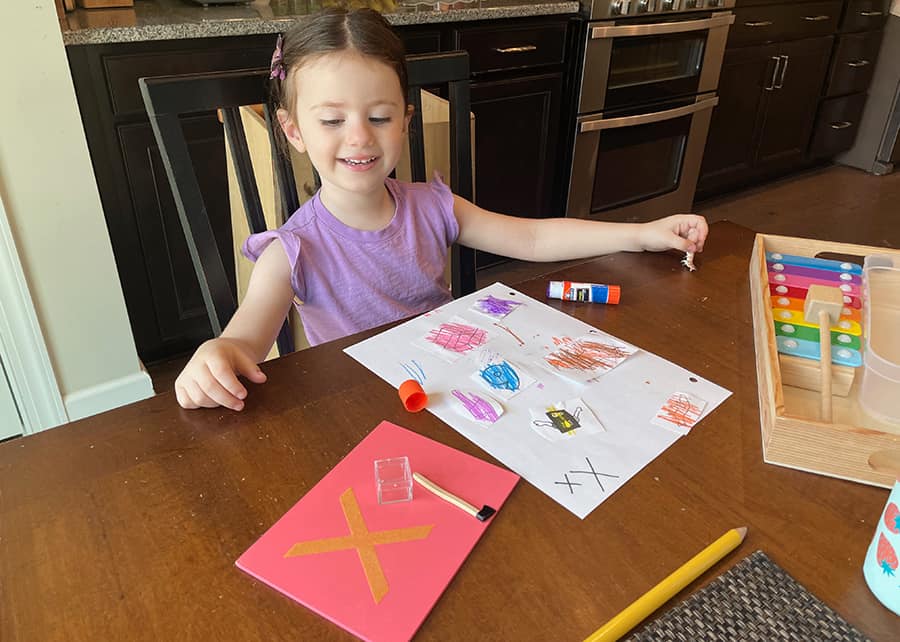
If your child loves to draw pictures, you could also have them draw things that begin with the letter sound on their page. Or you could draw pictures for your child to color in.
The ideas and options are endless, and setting up an activity that calls to your child’s interests is essential. Find ways to get your child involved and excited!
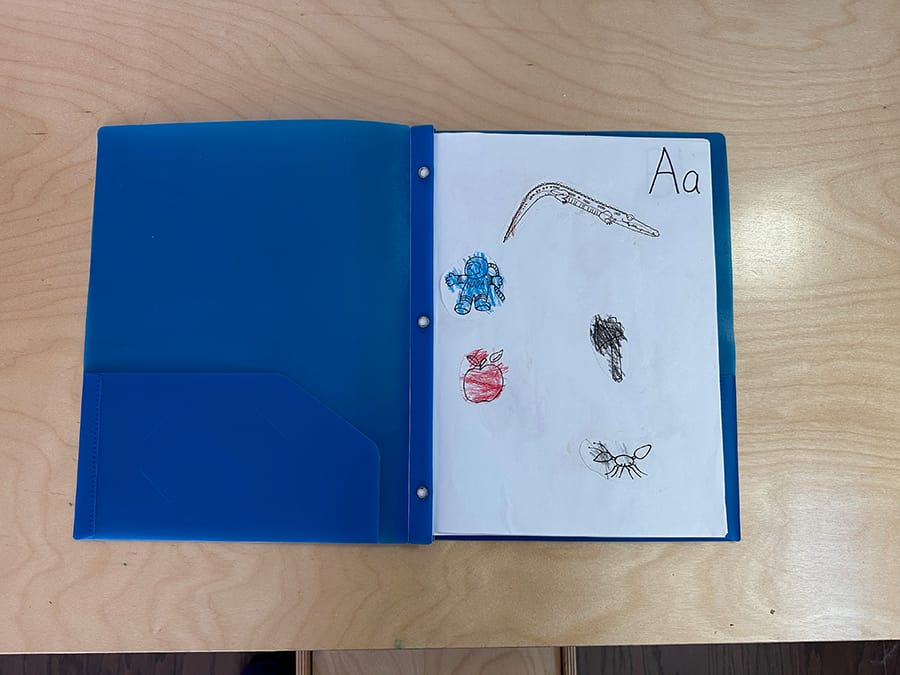
Annie is super excited about drawing pictures lately, so she drew pictures on this sound book page!
draw a picture of something that begins with /a/
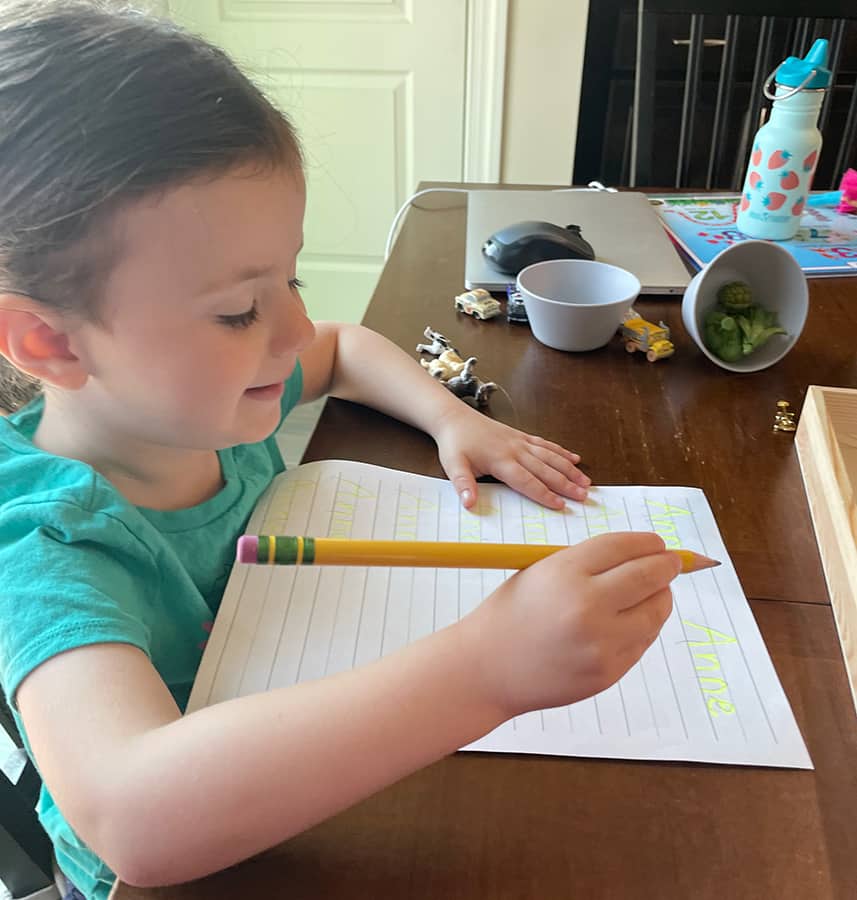
3. Optional: Letter handwriting practice
If your child is ready to practice tracing letters and would like to, you could also set up a handwriting worksheet for the letter you’re working on. This is optional. Some children are not ready to do this yet.
You can look for handwriting worksheets online. You could also find blank preschool or kindergarten lined paper and have your child trace over your letters. I like writing letters with a yellow highlighter for the kids to trace with their pencils.
Another idea is to have your child practice writing on a chalkboard or dry-erase board so that you can easily erase it and try again. Sometimes, kids don’t want to attempt to write letters on paper because they get frustrated if they make mistakes.
There is also a Montessori lesson called the sand tray, a flat tray filled with sand to practice writing a letter with your finger. This is optimal for young children just starting out and not quite ready for handwriting on paper yet.
Tip: For all three options of a chalkboard, dry-erase board, or sand tray, first, practice tracing the sandpaper letter for muscle memory, and then immediately “write” the letter.
Note: My blog will have a Montessori Handwriting section with more lesson plans and details coming soon. Look out for that!
Practice name writing
While creating a new sound book page, it’s also an excellent opportunity for your child to practice writing her name if she’s ready. Do this each time you create a new sound book page.
The handwriting pages do not go into the sound book
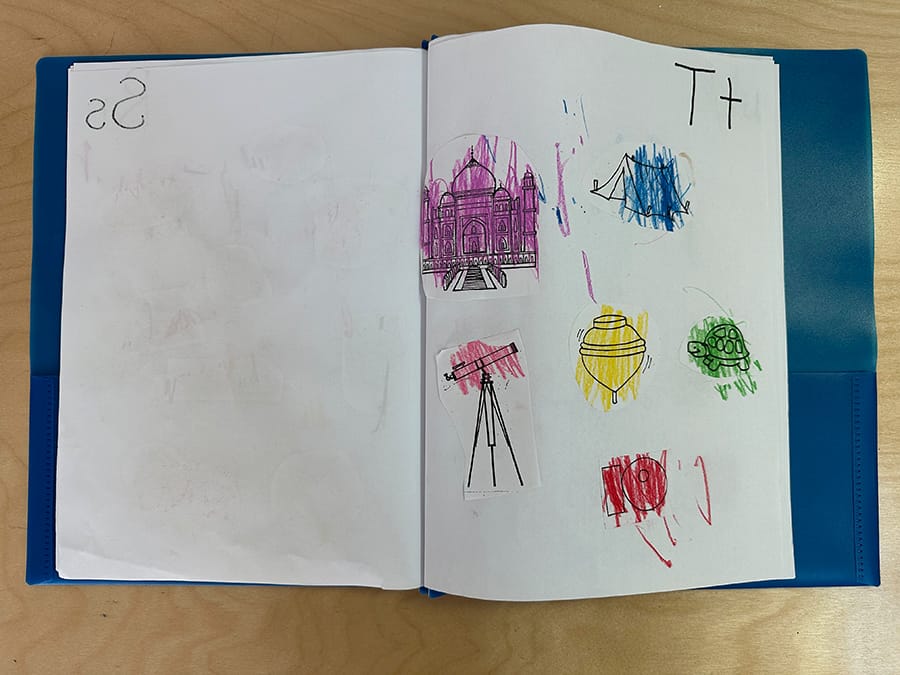
The handwriting sheets do not go into the final letter sound book. They are separate and for practice only, and they are optional. The final book will be one page per letter (A-Z), with 26 pages total.
Keep all of the handwriting practice sheets in a separate folder.
Your child’s letter sound book will become a visual dictionary for future reference. See the below section on “what to do next with your sound book.”
4. Assemble your book
I like to use folders with threeprongs and 3-hole punch the sound book pages. This way, you can place the letters in the sound book and bind them as you go. This works well if you choose to do the letters alphabetically.
Another idea is to get a regular folder and have your child choose the letters in any order she chooses. Keep the letters in the order she chooses in the folder. When you complete about 19 letters, then start to bind the letters in a book alphabetically, leaving a blank page for the letters she hasn’t finished yet. You could use card stock or construction paper to staple the book together for a cover.
a new sound book page for the letter w
What to do next with your sound book
Important: Before moving on to a new letter in your sound book, please review ALL of the previous letter pages completed with your child. Do this every time you create a new page. Have your child turn the pages herself, say the letter sound, and name all the pictures on the page.
This is a very important step because it helps your child to remember the sounds.
We don’t place the handwriting sheets into the final letter sound book because, eventually, the book will become a 26 page visual dictionary for your child. Keep the handwriting sheets in a separate folder.
When your child moves on to writing simple 3-letter phonetic words with the moveable alphabet, it’s possible that sometimes she could get stuck on a letter. Going through her letter sound book can help your child remember the letter she’s looking for.
Concluding Thoughts about the sound book
We started creating a DIY sound book project when Annie was about three-and-a-half years old. We made 1-3 new pages every week, and it took us about three months to get through all of the letters A-Z.
Note that every child will be different in how long it takes them to get through each letter and complete the book.
Annie loved creating her sound book! Seeing her excited about it and wanting to do a new page was amazing.
Overall, the experience is excellent for language development, and mastering letter sounds to prepare for reading. I saw a significant improvement in Annie’s skills. But this long-term activity also helps young kids with:
multi-task steps
learning to keep their work in order
taking ownership of their work
self-motivation
fine motor skills (cutting, pasting, coloring)
The beauty of this sound book is that your child can use it to “jog her memory” when she moves on to writing words with the moveable alphabet, which is coming up next in our language sequence. Annie’s sound book helped when she got to this step and began writing words.
I’d love to hear your story and where you are at in your journey. Are you thinking about starting a sound book with your child? Leave a comment below!
Montessori Letter Sound Book: keep track of sounds your child learned
I created a DIY letter sound book starter kit. It contains 3 small photos for each letter (78 photos total), a cover, and page templates for A-Z. if you’d like to download it, sign up for the resource library below. If you’re already a subscriber, use the updated password from my most recent email.
I love your blog, I just spend half an hour browsing and saving your articles 😊 I love this sound book, I will try to do it with my 4-year-old! (hopefully she’ll love it too ☺️) Thank you!
What a fun project!
Kids’ activities are always creative and engaging. Somewhere along the way learning becomes too serious.
We should always connect with the kid in us.
Thank you for sharing this wonderful idea and activity with the kids! I need to keep it in mind to do it one day with kids, when they will be a little bit older 🙂
Thank you for the awesome idea to make a cool diy project to enhance learning besides the old just read and write method. Learning to blog, love your post set up. Gave me inspiration for an idea I want to try.
Very educational! Thank you for sharing, I love this idea, great activity to do with kids. Sounds like a great fun way to help them practice phonetics and learn outside the classroom.
Wow! As always, your step by step breakdown of the activity with photos, tips, and instructions is wonderful. And I love how this is sure to result in something that will not only help children learn but will be a keepsake of sorts for later years.
Thank you so much. I’m so glad you enjoyed reading about the letter sound book. I agree that bringing creativity into the work makes the lesson more inviting!
Such fun ideas for a very important lesson! Young learners are very busy so it is great to find activities that will not only teach them an academic skill, but work on other skills as well. You have done that! Thank you for sharing!


Pingback: Simple Letter Recognition: 4 Engaging Moveable Alphabet Ideas
Such a cute project! You always have such creative ideas.
Such an interesting post with a wonderful step-by-step plan!
I love your blog, I just spend half an hour browsing and saving your articles 😊 I love this sound book, I will try to do it with my 4-year-old! (hopefully she’ll love it too ☺️) Thank you!
What a fun project!
Kids’ activities are always creative and engaging. Somewhere along the way learning becomes too serious.
We should always connect with the kid in us.
Thank you for sharing this wonderful idea and activity with the kids! I need to keep it in mind to do it one day with kids, when they will be a little bit older 🙂
Thank you for the awesome idea to make a cool diy project to enhance learning besides the old just read and write method. Learning to blog, love your post set up. Gave me inspiration for an idea I want to try.
Saving this for when I have kids 💕💕
Very educational! Thank you for sharing, I love this idea, great activity to do with kids. Sounds like a great fun way to help them practice phonetics and learn outside the classroom.
This seems fun to do with the kids. The handwriting practice is good for the kids. Thank you for sharing!
Your post is very detailed and you have provided lot of fantastic method for teaching letter sounds.
Wow! As always, your step by step breakdown of the activity with photos, tips, and instructions is wonderful. And I love how this is sure to result in something that will not only help children learn but will be a keepsake of sorts for later years.
This is an awesome idea! I might have to include this with my homeschool lessons!
This sounds like a great way to teach letter sounds. As someone who has never taught before, I loved all the info you gave.
Hi Audrey,
Thank you so much! I am glad that you enjoyed reading about the letter sound book!
Blogger to blogger, I love how you’ve set this out! Really straightforward and easy to understand. Thanks for sharing.
Hi Abby,
Thank you for your kind words! I’m glad you enjoyed reading about the Montessori letter sound book!
Very helpful tips to let the kids learn and at the same time have fun in creating DIY activities that can also enhance their creativity.
Hi Luca,
I agree! It makes such a difference when we create a meaningful activity like the DIY letter sound book for our kids’ learning.
This is so cute, I think having these DIY arts and crafts is a great way for kids to express their creativity as well. Thanks for sharing!
Hi Nia!
Thank you so much. I’m so glad you enjoyed reading about the letter sound book. I agree that bringing creativity into the work makes the lesson more inviting!
Such fun ideas for a very important lesson! Young learners are very busy so it is great to find activities that will not only teach them an academic skill, but work on other skills as well. You have done that! Thank you for sharing!
I’ve never seen this before! What an adorable idea