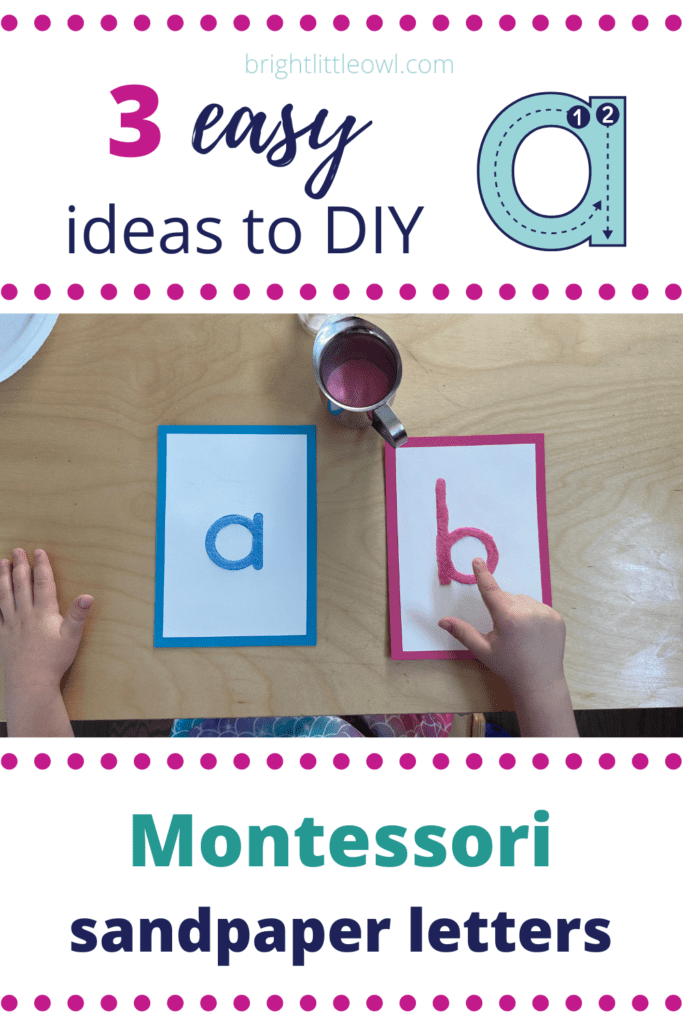
Sensory phonics activity with the Montessori Sandpaper Letters
In my previous blog post, How To Increase Phonemic Awareness With These 4 Sound Games, I talk about the I-Spy Games. Once your child has explored quite a bit with these sound games, it’s time to move on to the sandpaper letters; associating the sounds with the symbols.
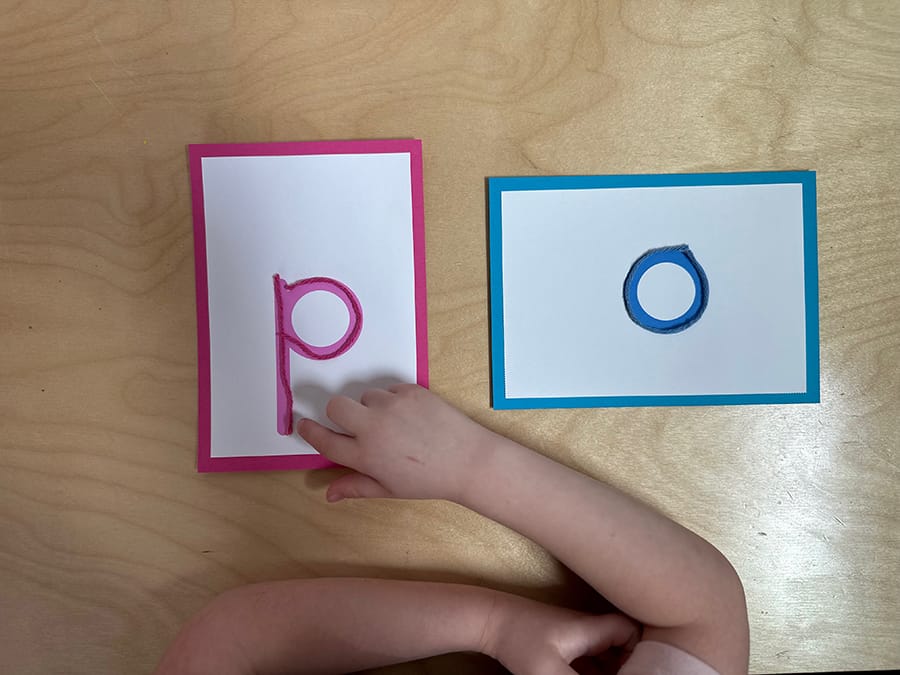
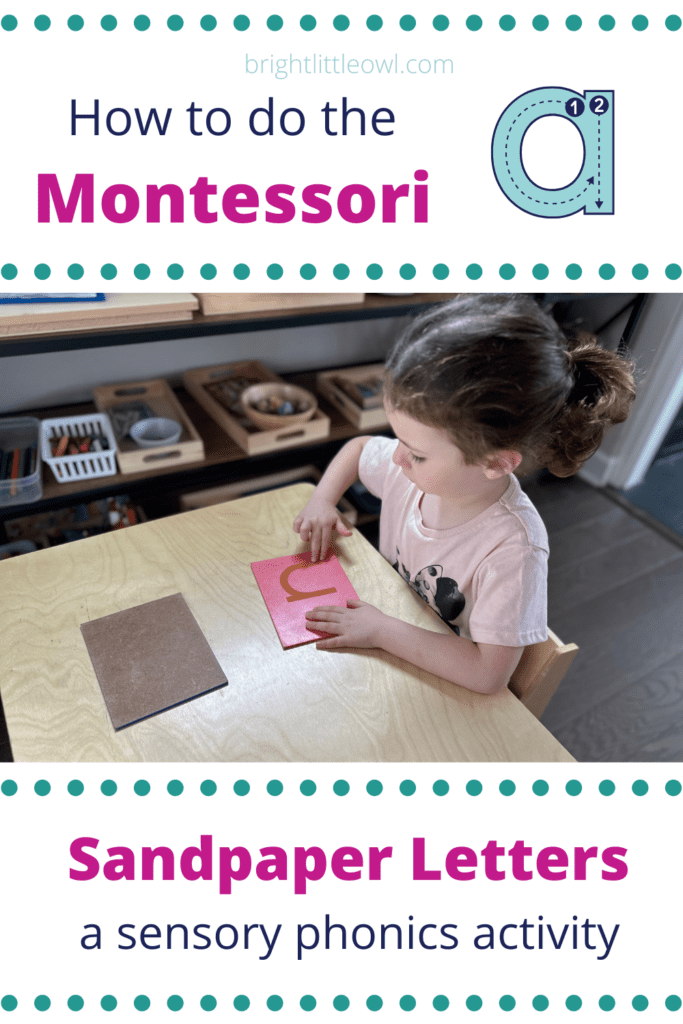
The purpose of the sandpaper letters is for your child to trace the tactile letters with her fingers to experience the letter symbol. It helps your child to get an internal impression of the letter shape, which prepares her later on for writing.
When my daughter, Annie, turned three-and-a-half last winter, I first introduced the sandpaper letters to her at home. She loved tracing them, and we continued for the next several months and got through them all!
I had a spare set of letters I purchased when I was a Montessori teacher and kept them all these years, and I was glad to experience them with Annie!
In this post, I’ll share three easy ideas for you to DIY your letters at home. I’ll also share the sandpaper letter lesson I learned from my Montessori training!
Table of Contents
What are the Montessori Sandpaper letters?
The sandpaper letters are one of the most iconic Montessori materials. They are a hands-on sensory way of exploring the graphic symbol (letter) that goes with the phonetic sound. Your child is visualizing what the sounds look like; with the hand and mind.
"When a teacher has a child see and touch the letters of the alphabet, three sensations come into play simultaneously: sight, touch, and kinesthetic (muscular) sensation. This is why the image of the graphic symbol is fixed in the mind much more quickly than when it is acquired through sight in the ordinary methods."
The child must trace the letters with her fingers to put the letterforms into the child’s “muscle memory,” rather than only recognizing the letter shapes visually.
According to Maria Montessori, young children are in the sensitive period for touch, sound, and language. We want to invite our children to feel the letter as often as possible because “feeling and sight” give two messages.
With the sandpaper letter lesson, we educate the hand for writing-muscle memory. We are also preparing the mind for writing and reading and isolating the sounds of words.
"teaching children the sounds made by individual letter or letter groups (for example, the letter “c” makes a k sound), and teaching children how to merge separate sounds together to make it one word (for example, blending the sounds k, a, t makes CAT)."
The article goes on to say that effective phonics instruction is the strong foundation needed to build up strong reading and writing skills.
Learning phonics with the Montessori sandpaper letters is a hands-on and sensory approach to the development of writing and reading.
The sandpaper letters help young children with the:
recognition of the difference between vowels and consonants
phonetic building of words
visual recognition of words
kinesthetic recognition of letters
phonetic sound of letters
training for light touch needed for writing
Here are the 3 easy ideas to make the letters DIY
DIY sandpaper letters with glue and colored salt
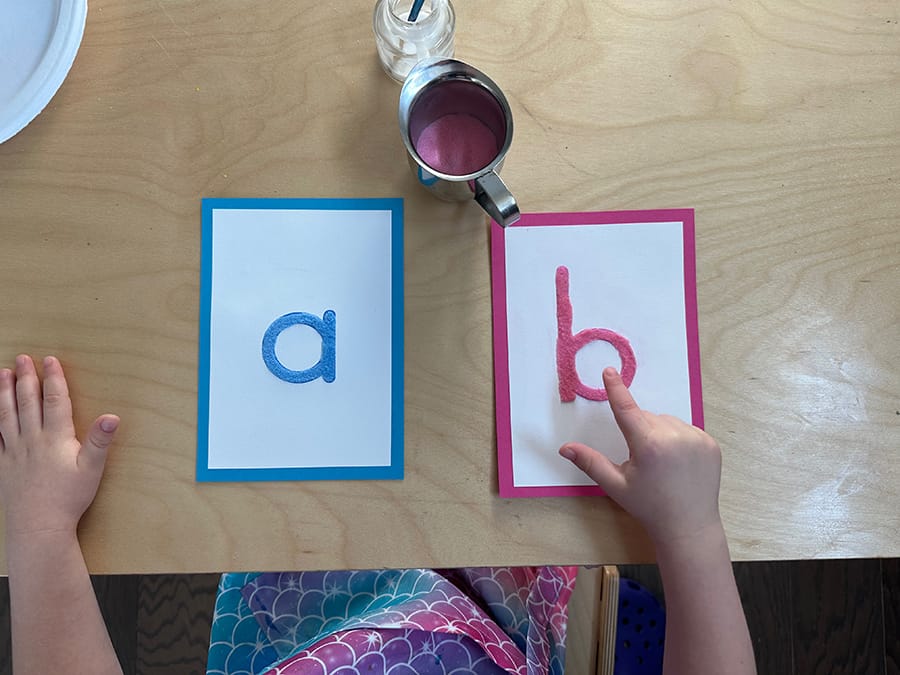
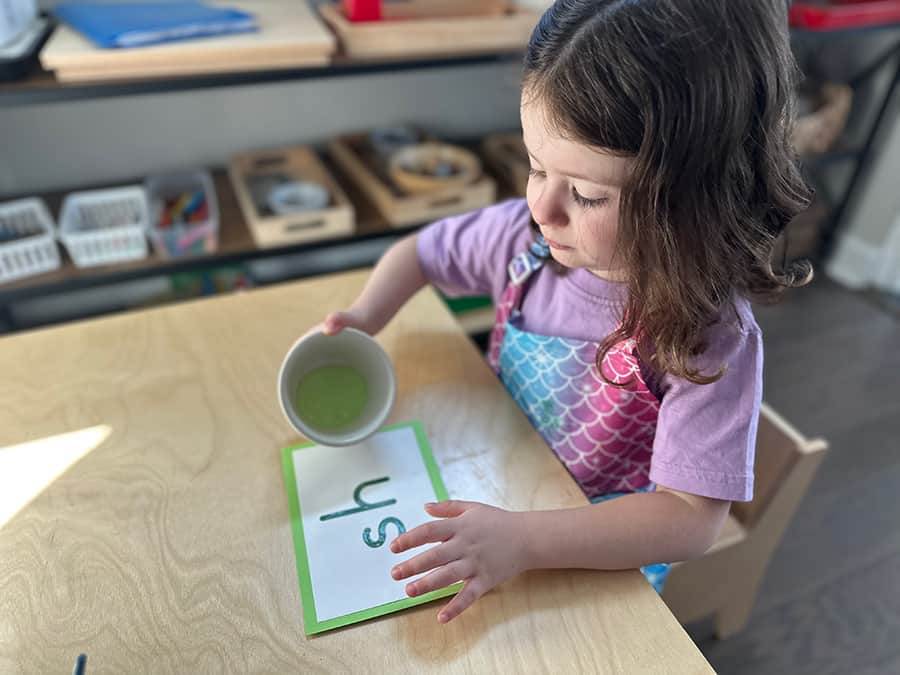
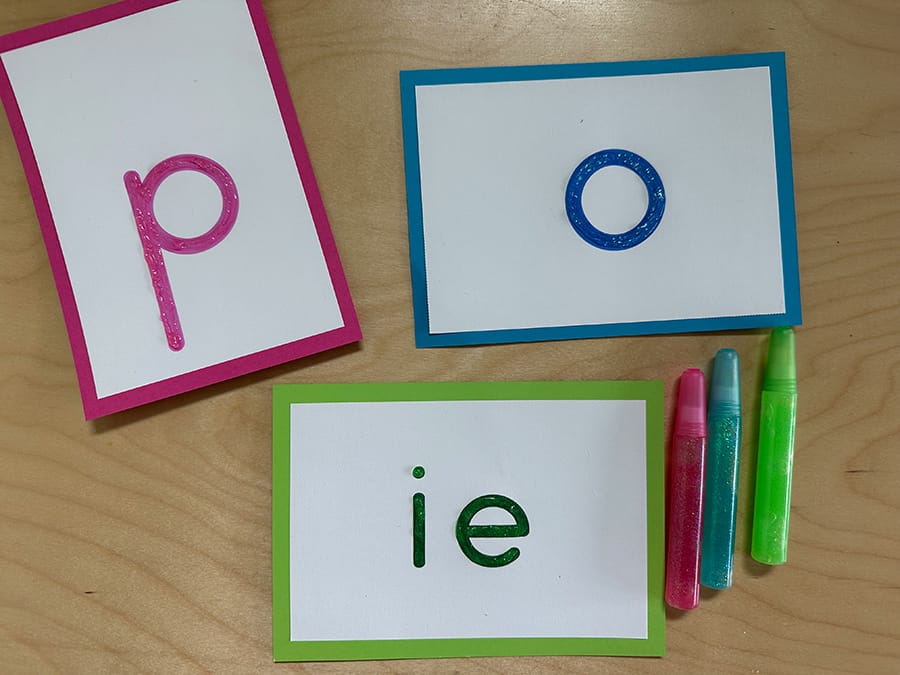
1. Glue with colored salt (or sand, or glitter)
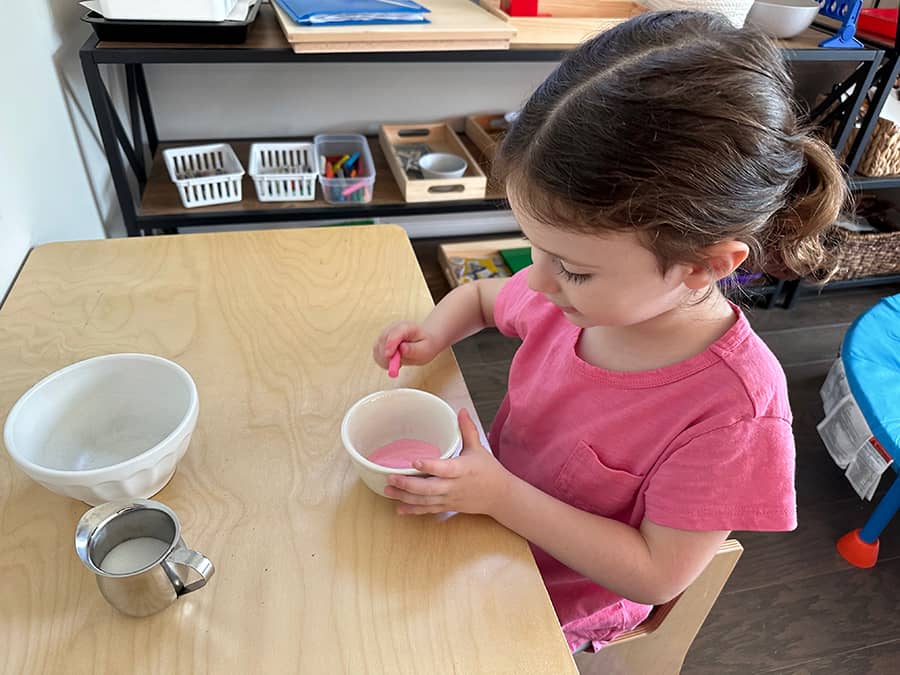
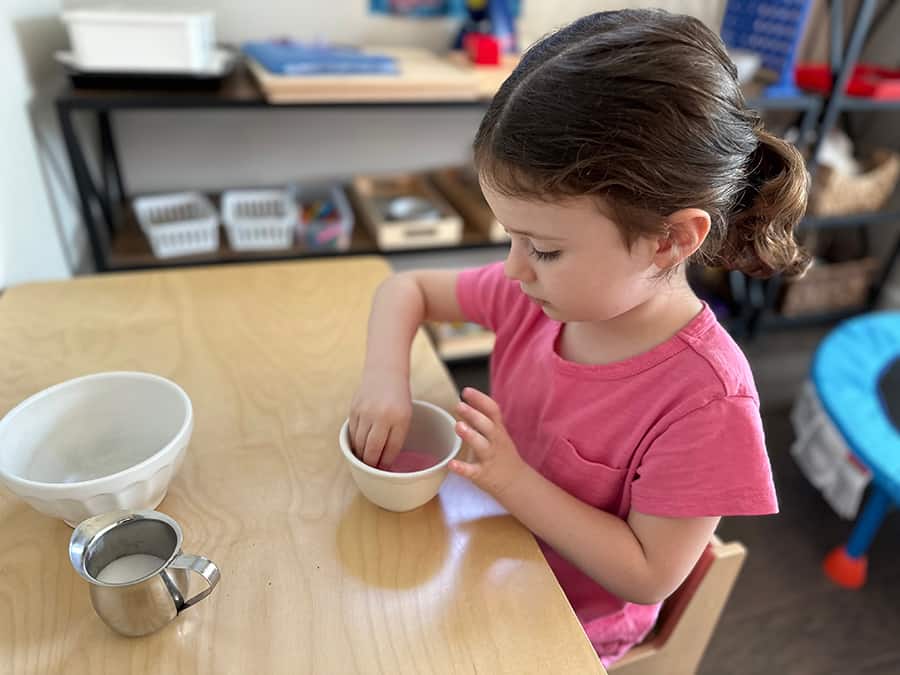
This is an easy and fun method for making your letters at home. We made them with colored salt. If you have regular table salt and chalk at home, you can make the colored salt so that you have pink salt for the consonants, blue salt for the vowels, and green salt for the double letters.
Coloring the salt is optional, but it looks beautiful. You could also use colored sand or glitter if you have them on hand. Sand is probably longer lasting than salt but rougher. Note that glitter can be very messy! I recommend adding the glitter outdoors, if possible.
To make the colored salt, pour some salt into a tiny bowl and swirl a piece of chalk in the salt. After several minutes, the salt turns the same color as the chalk. The bonus is the fine-motor practice, which strengthens the hand for using a pencil!
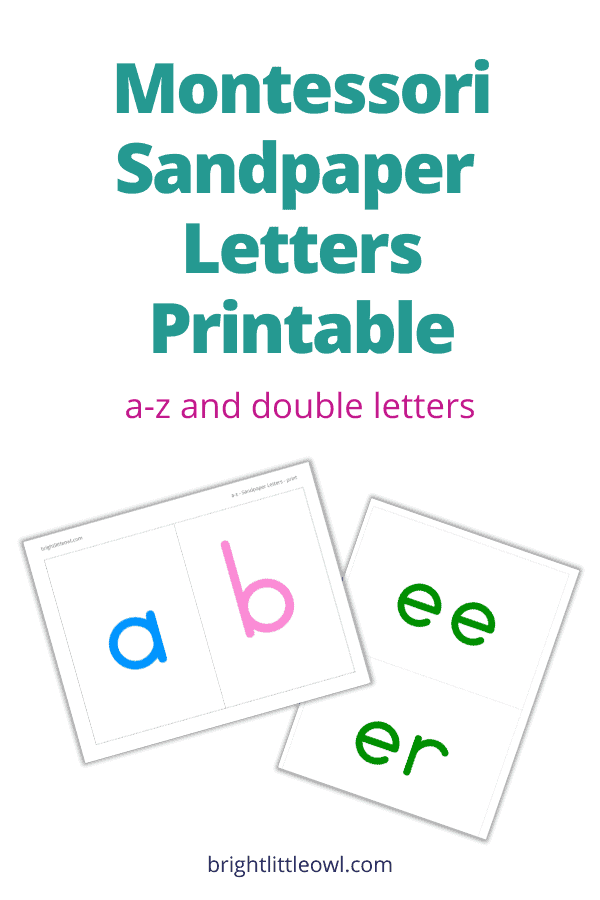
To make the DIY sandpaper letters: print out the letters in a large font on card stock, two letters to a page. Cut out the letter cards. You can mount them on thicker colored card stock, so they are sturdier.
* I created a printable for the DIY letters. If you’d like to download them, sign up for the Resource Library at the bottom of this page.
Next, paint white Elmers’ glue on the entire letter with a paintbrush. You could also draw the letter directly from the glue bottle and smooth the glue over the whole letter with your finger or a paintbrush.
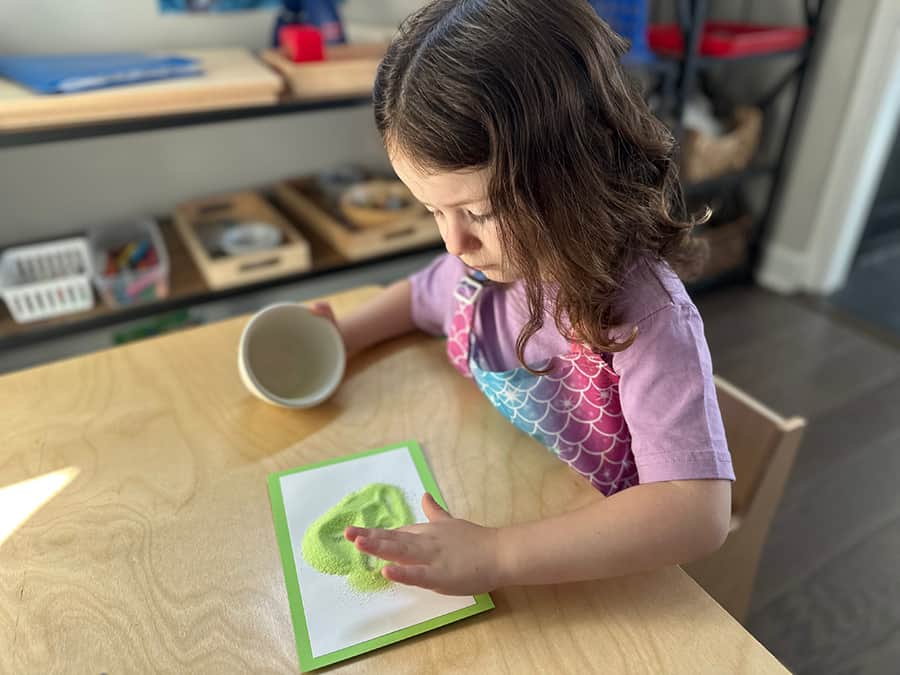
You could also use stronger glue, like tacky glue, to last longer. While the glue is still wet, pour the colored salt over the letter and shake off the excess. Let it dry for several hours. Annie helped me pour the salt over the letters, and she had so much fun!
DIY letters made with colored salt
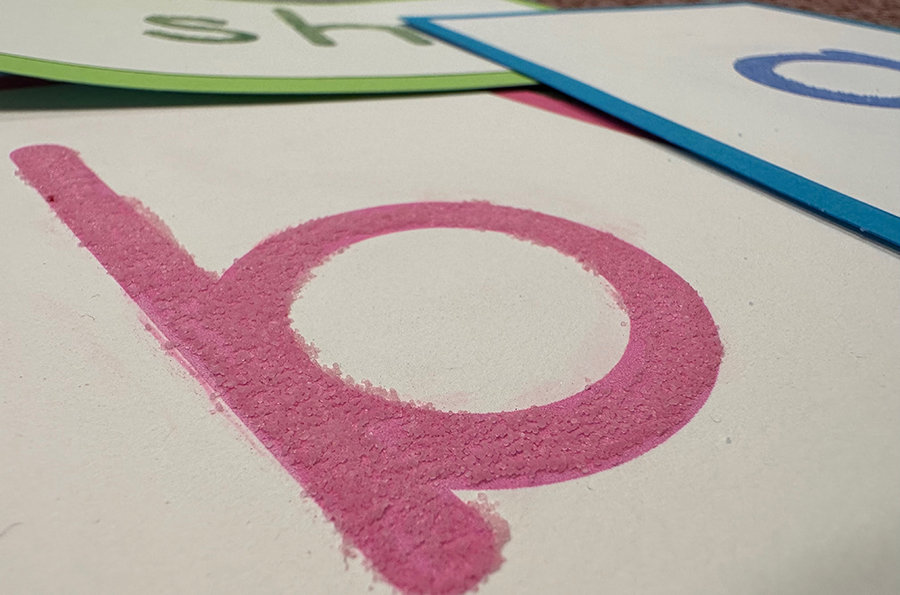
Note: After the glue dries for several hours, if you glide your finger over the salt, a lot of excess salt will fall off. You’ll be left with a very thin layer of salt on the letter. This is okay and this is what we want. The thin layer of salt is more gentle to touch than sand.
DIY letters with yarn
2. Glue yarn or items from nature
Another idea is to create DIY letters with yarn or items from nature. You will set up the letters the same way as idea number 1 above, but this time you will shape pieces of yarn to make the letter.
Annie explored the yarn and loved shaping it into letters. Then, you can glue the yarn to the letter. Wait several hours for it to dry, and you have sensory letters to trace. The letters are not rough like sand or sandpaper, so this option is great for kids who don’t like rough sand.
You can also use items from nature instead of yarn. For example, get some flower petals or leaves, break them into pieces, and glue them onto the shape of the letter. I didn’t do this with Annie yet, but we look forward to trying this with some Fall leaves this season!
DIY letters with glitter glue
3. Glitter glue or puffy paint
The glitter glue or puffy paint method is probably the quickest way to make the DIY letters. Set up the letters on card stock, as mentioned in the idea number 1 above. Then, simply get a glitter glue pen or puffy paint bottle and write on the letters. Spread it evenly over the letters, if needed. Let them dry for several hours.
The glitter glue has a nice roughness to it like sand, but gentler. The puffy paint is smooth, if you’d prefer something not sand-like.
Other DIY letter ideas and exploration
You can use the letter cards to make non-permanent sensory letters. For example, you could shape letters out of:
play dough
modeling clay
kinetic sand
wiki stix
These letters will not last forever, but it’s a fun way to explore the shape of the letters in a sensory way.
How to do the Sandpaper Letter Lesson
What you will need
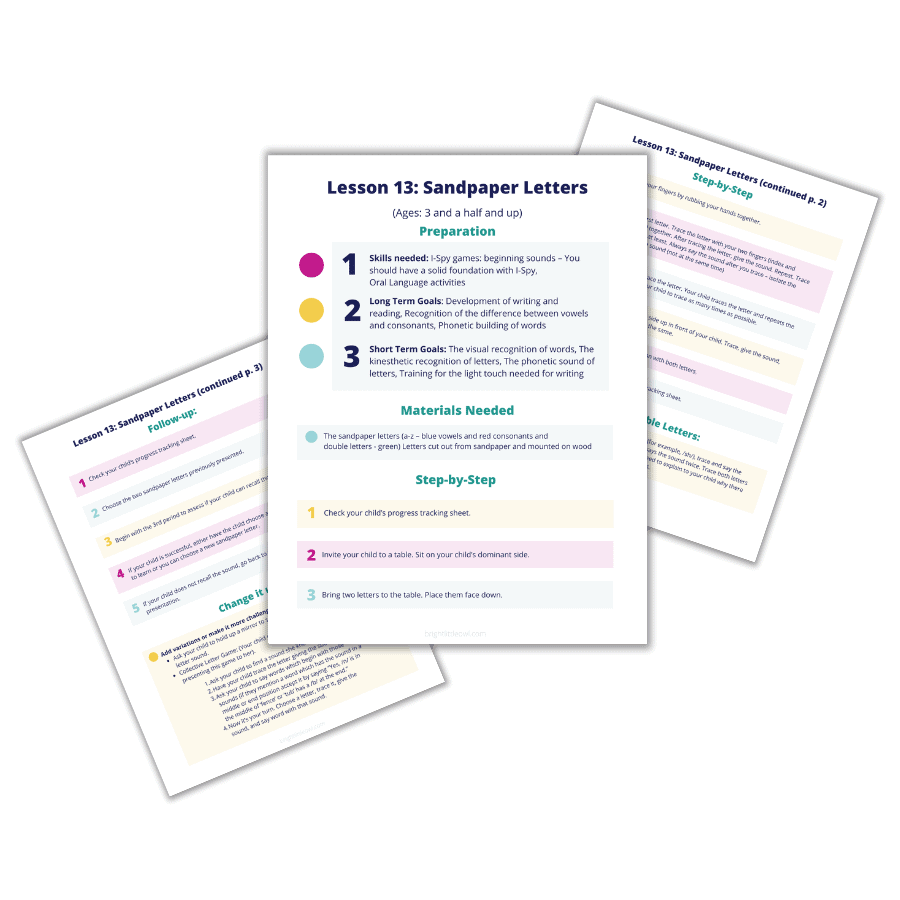
The sandpaper letters (a-z – blue vowels, red consonants, and green double letters): letters are cut out from sandpaper and mounted on wood; or, the DIY letters you made with the ideas above!
Note: you can choose print letters or cursive letters; it is your preference and either are great choices. I’ve noticed that cursive has been popular lately because the curves and the tails are more fluid and easier for young children to trace. Also, evidence-based studies have suggested that cursive is good for brain development and memory. Be consistent with print or cursive when you move on to the moveable alphabet.
Buying the letters
If you’d like the traditional letters, you can purchase Montessori sandpaper letters online. If you search for them, you’ll find many affordable options. I recommend buying them if you have multiple children using them or plan on having them for a long time.
If you’d like to purchase a high-quality set, you could resell them reasonably. You can get the highest quality set fromNienhuis.
You can also make your own traditional sandpaper letters by cutting traced letters out of sandpaper and mounting them on wood. This method is time-consuming, but if you’re passionate about making them, go for it!
In what order should I present the letters?
When presenting the letters to your child, it is best to mix them rather than group them or do them in alphabetical order. Change them around every day and make them attractive to your child.
Keeping this in mind, you can choose what works best for you. In the classroom, I’ve seen different teachers mix letters and group them into sets of 5. For instance, m, a, c, t, b are often the letters in the first group because they are common letters found in the first early readers, like the Mac and Tab books.
If you’d like to learn the letters in alphabetical order with your child, that’s okay, too. It’s up to you!
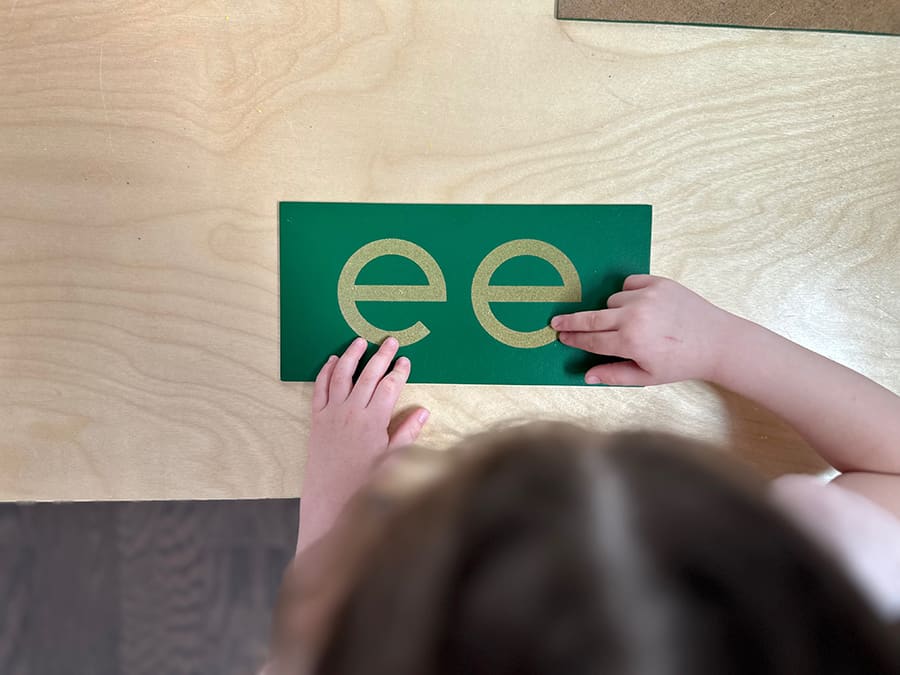
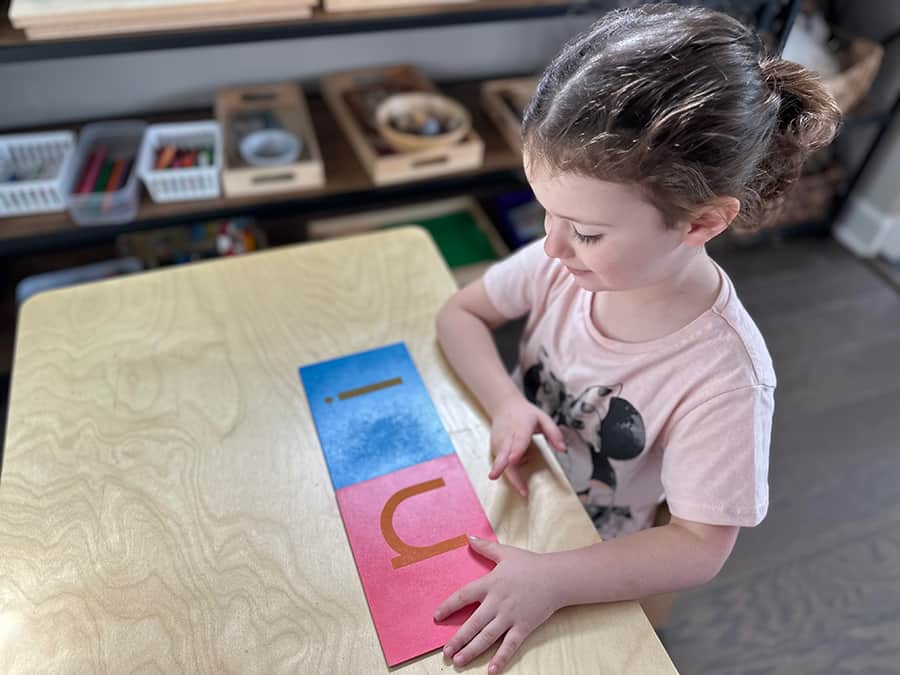
green double sandpaper letters: /ee/ as in "beep"
Note: For the green double letters (for example, /ee/), trace and say the sound twice. Then your child traces and says the sound twice. Trace both letters, then give the sound it makes. You don’t need to explain to your child why there are two letters; she will learn to accept this.
For the first presentation:
The first time: Have your child pick two single letters. After your child has learned two single letters, she can choose from any sandpaper letters, including the green double letters.
You could suggest that you will choose a letter, and your child will choose a letter.
Begin with sounds that have an emotional connection to your child; for example, the sandpaper letter that represents the first sound in her name.
Also, start with letters your child likes the most and letters that are easier and look and sound different. For example, it may be confusing to your child if you choose /m/ and /n/ simultaneously, as a first lesson.
Note that we want this lesson to be exciting! Present the letters in a way that’s lively and engaging.
Step-by-step Sandpaper letter lesson
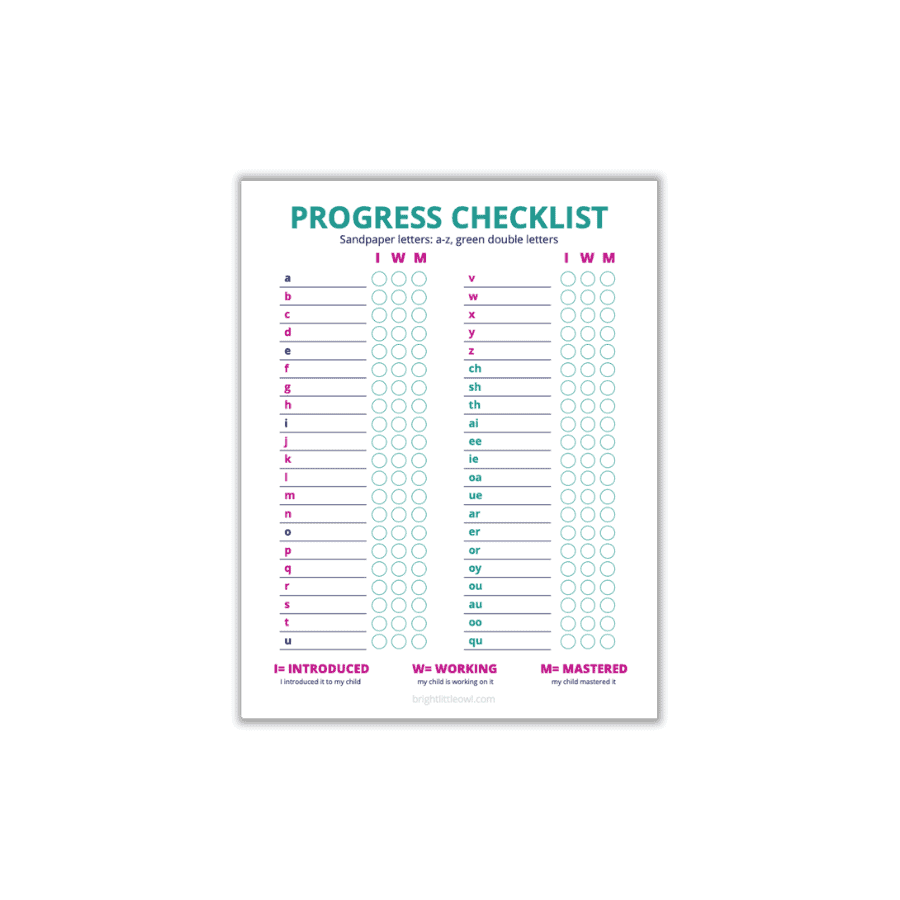
Check your child’s progress tracking sheet. It’s essential to keep track of the letters your child has worked on already.
* I made a progress tracking sheet. If you’d like to download it, sign up for the Resource Library at the bottom of this post.
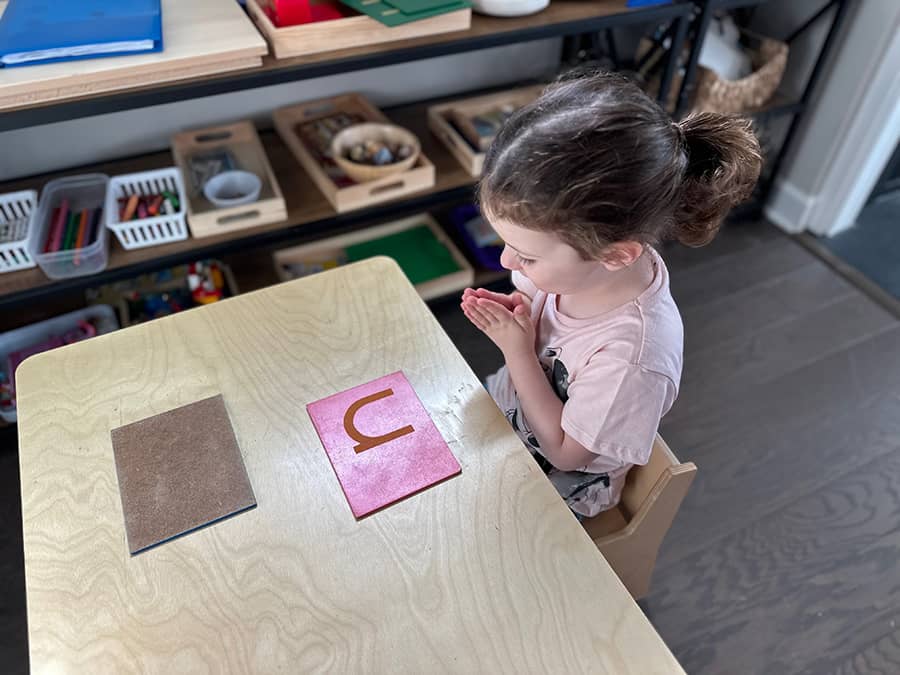
Invite your child to a table. Sit on your child’s dominant side.
Bring two letters to the table. Place them face down.
sensitize your fingers
Sensitize your fingers by rubbing your hands together.
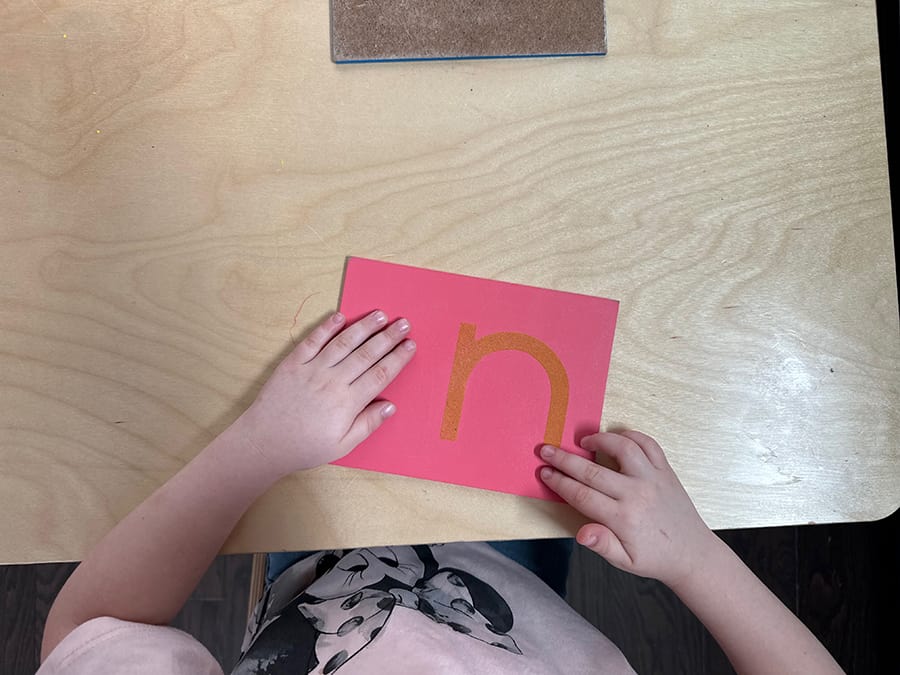
Turn up the first letter. Trace the letter with your two fingers (index and middle fingers) together. After tracing the letter, give the sound. Repeat. Trace the letter twice, at least. Always say the sound after you trace – isolate the touch, isolate the sound (not at the same time).
trace the letter then say the sound, /n/
Invite your child to trace the letter. Your child traces the letter and repeats the sound. Encourage your child to trace as many times as possible.
Place the next letter right side up in front of your child. Trace, give the sound, and invite your child to do the same.
Do the three period lesson with the letters
Do the extended 2nd-period lesson with both letters. For example, say, “trace the /n/, pick up the /n/, put the /n/ back on the table, and so on. See my blog post on the Three Period Lesson.
Record on your child’s progress tracking sheet.
* I made a progress tracking sheet. If you’d like to download it, sign up for the Resource Library at the bottom of this post.
Follow up lessons:
Note: The next time you work on sandpaper letters with your child, do not introduce any new letters until your child knows the first ones. Go back and get the two letters you did previously. Say to your child, “what’s this?” or “remember this?” (the third period from the 3-period lesson).
Check your child’s progress tracking sheet.
Choose the two sandpaper letters previously presented.
Begin with the 3rd period to assess if your child can recall those sounds. For example, ask, “what is this?” See my blog post on theThree Period Lesson.
If your child is successful, either have the child choose a new sandpaper letter to learn or you can choose a new sandpaper letter.
If your child does not recall the sound, go back to the step-by-step presentation above.
More ideas for the sandpaper letter lesson
Third-period game: Turn the letter around (upside down), so you can’t see it. Say, “knock, knock,” “who’s there?” Turn over the letter and say the sound.
Ask your child to hold up a mirror to see her mouth move while saying the letter sound.
Collective Letter Game: (Your child needs to be secure with tracing before presenting this game to her).
Ask your child to find a sound she knows.
Have your child trace the letter giving the sound.
Ask your child to say words which begin with those sounds (if she mentions a word which has the sound in a middle or end position accept it by saying “Yes, /n/ is in the middle of ‘fence’ or ‘tub’ has a /b/ at the end.”
Now it’s your turn. Choose a letter, trace it, give the sound, and say word with that sound.
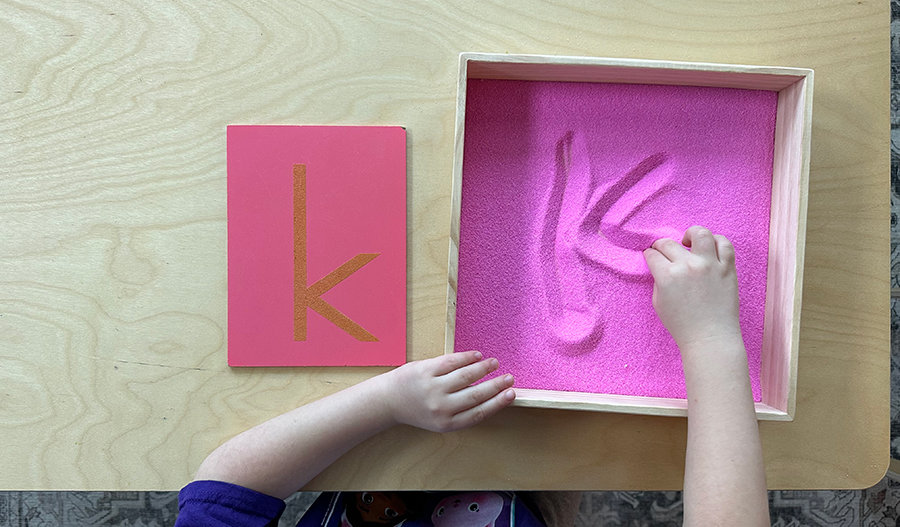
After tracing the sandpaper letter, write the letter in the sand in a sand tray. To learn more about the sand tray lesson, go to my blog post:
Associating a word with the sound is encouraged. Each time the letters are presented to your child, mention a word containing the sound and ask her to tell you a few more words beginning with or containing the sound.
Remember, we are not teaching sounds. Your child knows the sounds; we introduce the “pictures” or graphic symbols with the sandpaper letter lesson.
Children will learn the names of the letters later. For this activity, you are just learning the sounds, not the names of the letters. Reinforce your child’s knowledge of the letters.
Concluding Thoughts about the Sandpaper Letters
Annie enjoys exploring with sandpaper letters. We worked with them for several months last Spring. She also had so much fun helping me make the letters these past few weeks. Coloring the salt with chalk and pouring the salt on the letters was a bit hit!
It is a commitment to get through all the letters, but it’s worth building a solid foundation with this hands-on phonics activity to prepare for writing and reading.
Hands-on phonics activity with the Montessori Sandpaper Letters
* If you’d like to download the Sandpaper Letters printable, progress checklist, and the lesson plan, sign up for the resources library at the bottom of this post. If you’re already a subscriber, see my most recent email for the updated password.
That’s a brilliant idea to teach kids using the sandpaper letters. My boy is also now on the stage where he is tasked to learn about phonics as well. This post is such a great help.
This looks like a great and easy way to teach kids letters! I have never heard of sandpaper letters before, but I bet the texture makes it fun to learn.
This looks like a lot of fun & I like the idea of using colored salt in place of actual sand. Thanks for sharing this awesome idea! I will pass this onto a friend of mine with small children.
I love this and the interaction of sandpaper sounds so fun, I would have loved this (I think!) as a kid. This is great and I am getting more interested in setting up my own kids to do montessori teaching. Thanks for sharing!
I sure do wish I had known about Montessori when my children were small. However, it is fun sharing these ideas with my grandchildren! The sandpaper letters are new to me. Thanks for sharing the DIY options of creating our own. I also found the section on what order you should present the letters….my mind would have automatically done it in alphabetical order. Thank you so much for the wonderful tips!
Hi Michelle, I’m glad you found reading about the order to learn the sandpaper letters helpful. When the kids get to choose the letters that call to them in any order they wish, they seem to be more excited and motivated about them! But, of course, if you’d like to do alphabetical order, that’s fine, too!


Thank you
Hi Palupi,
I am so happy that the DIY Montessori sandpaper letters article has been helpful to you.
Pingback: Essential Guide To 4 Fun Letter And Sound Activities
Pingback: Easy and Fun Beginning Sounds Game (Letter Object Matching)
What a brilliant idea! We have never tried sandpaper letters and we’d love to try. Thank you for these DIY tips. Super appreciate it.
LOVE this! What a thorough explanation and description of how to use the letters too. Thanks for sharing!
Such great ideas! It is helpful to have these with visuals and in one place.
This is such a neat idea! lol I would want to trace those textured letters too! Sharing with my friends with toddlers.
Great ideas! I will have to try that one day!
How have I never heard of sandpaper letters before? I love this. What a great way to add another level of processing by touching the rough surface.
What a great idea! I’ll have to try this with homeschooling.
such a fun and creative way to learn letters.. and so colorful too
That’s a brilliant idea to teach kids using the sandpaper letters. My boy is also now on the stage where he is tasked to learn about phonics as well. This post is such a great help.
Hi Akyn, I’m so glad you found the sandpaper letters lesson helpful! That’s great that your son is ready to learn phonics as well.
I am going to need to make some of these for my daughter. She is learning to write some letters so this would be perfect to help.
Hi Samantha, It’s great that you want to make sandpaper letters for your daughter!
This looks like a great and easy way to teach kids letters! I have never heard of sandpaper letters before, but I bet the texture makes it fun to learn.
Hi Diana, Yes, the sensory texture of the sandpaper letters makes it so intriguing and fun!
Great ideas! I am definitely going to use some of them when my daughter is older.
This looks like a lot of fun & I like the idea of using colored salt in place of actual sand. Thanks for sharing this awesome idea! I will pass this onto a friend of mine with small children.
I love this and the interaction of sandpaper sounds so fun, I would have loved this (I think!) as a kid. This is great and I am getting more interested in setting up my own kids to do montessori teaching. Thanks for sharing!
These ideas are so creative and easy to do. So vibrant to engage all senses.
This is so creative!
I sure do wish I had known about Montessori when my children were small. However, it is fun sharing these ideas with my grandchildren! The sandpaper letters are new to me. Thanks for sharing the DIY options of creating our own. I also found the section on what order you should present the letters….my mind would have automatically done it in alphabetical order. Thank you so much for the wonderful tips!
Hi Michelle, I’m glad you found reading about the order to learn the sandpaper letters helpful. When the kids get to choose the letters that call to them in any order they wish, they seem to be more excited and motivated about them! But, of course, if you’d like to do alphabetical order, that’s fine, too!
This is a fun idea to do with the kids. I miss doing crafts like before. Thank you for sharing!
I love these! Great learning ideas that you can do easily at home!