The metal inset activity is an essential and critical lesson in the language area of the classroom. It prepares young children for handwriting.
While working with this material, it seems like we’re creating fun and gorgeous pictures; your child is also strengthening her hand for writing. There is also something meditative and peaceful about tracing the shapes and making unique designs.
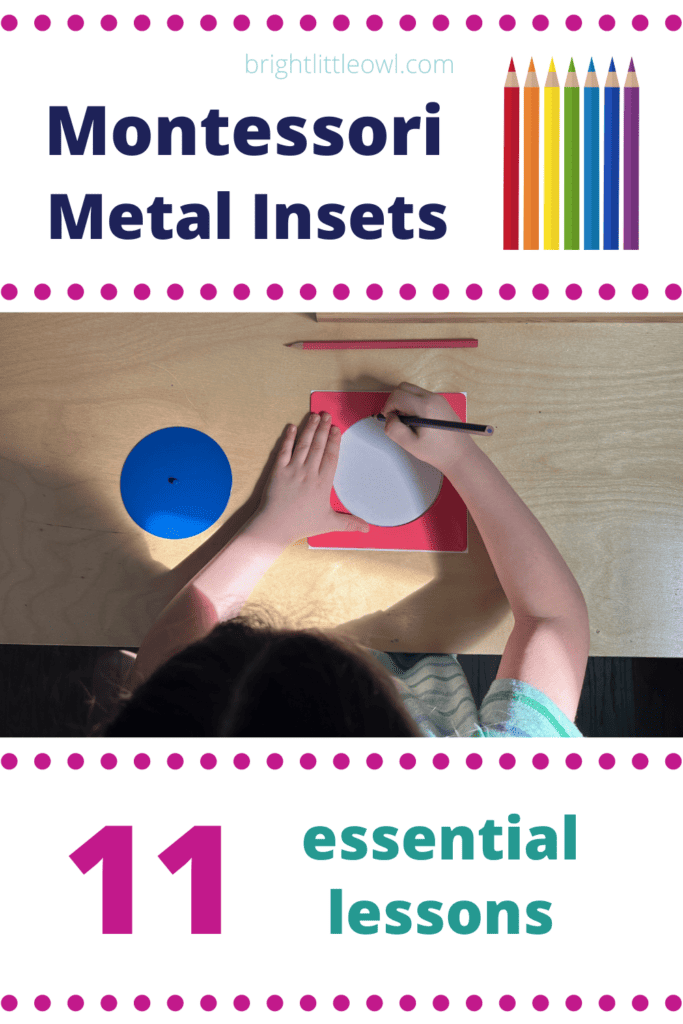
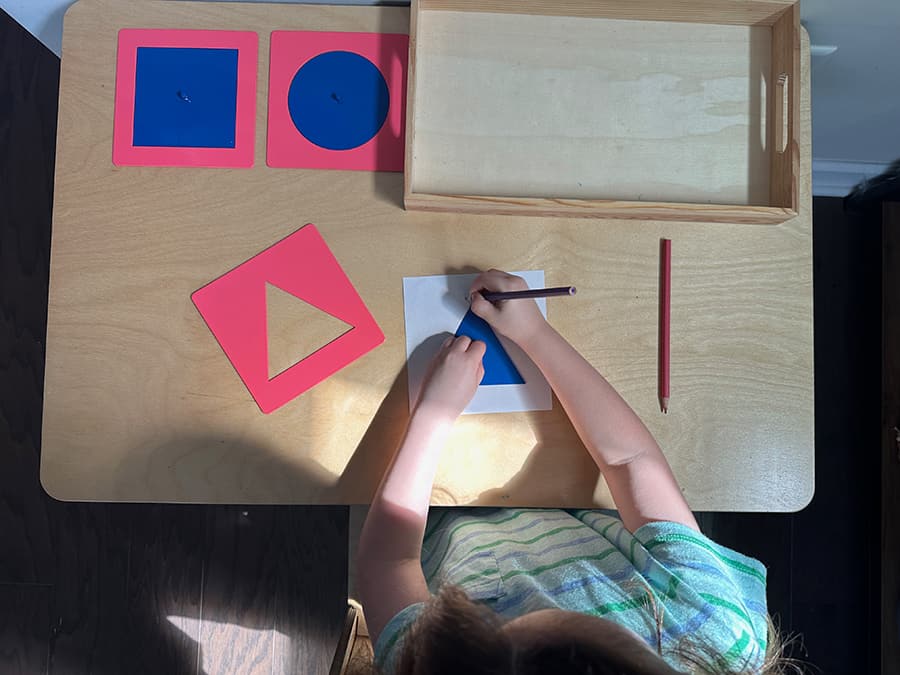
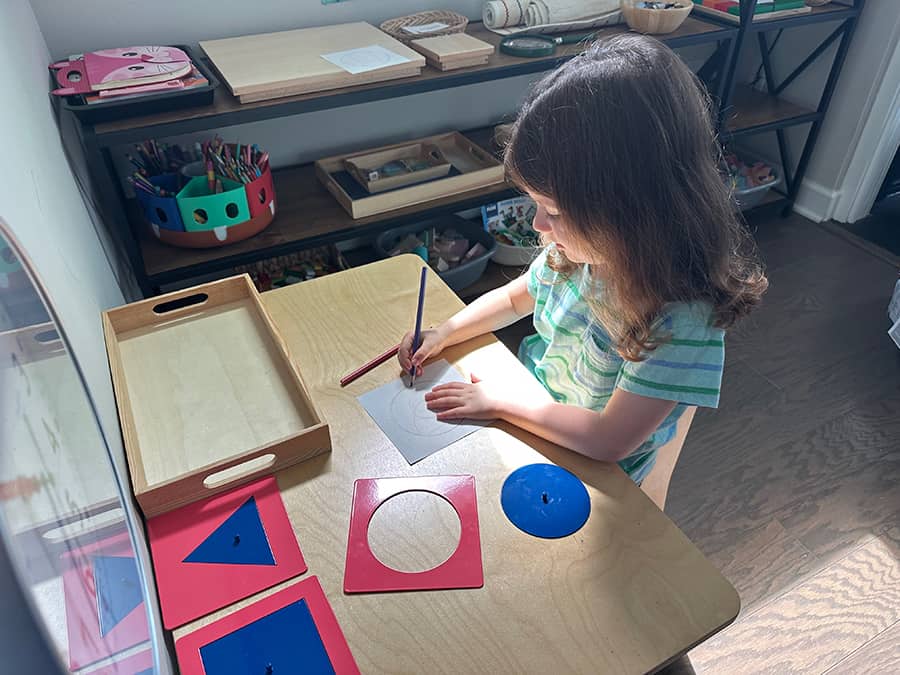
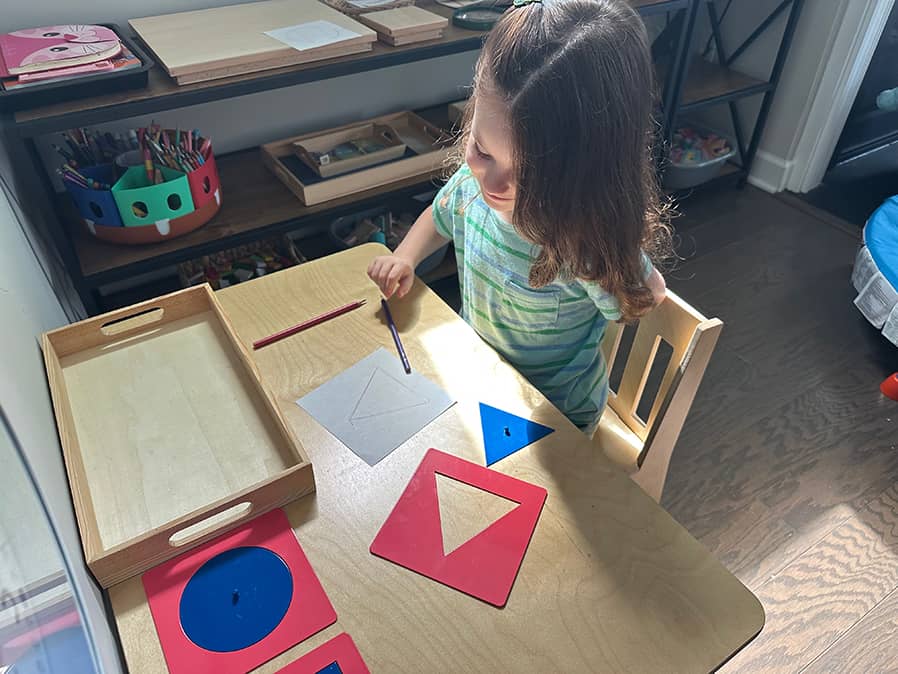
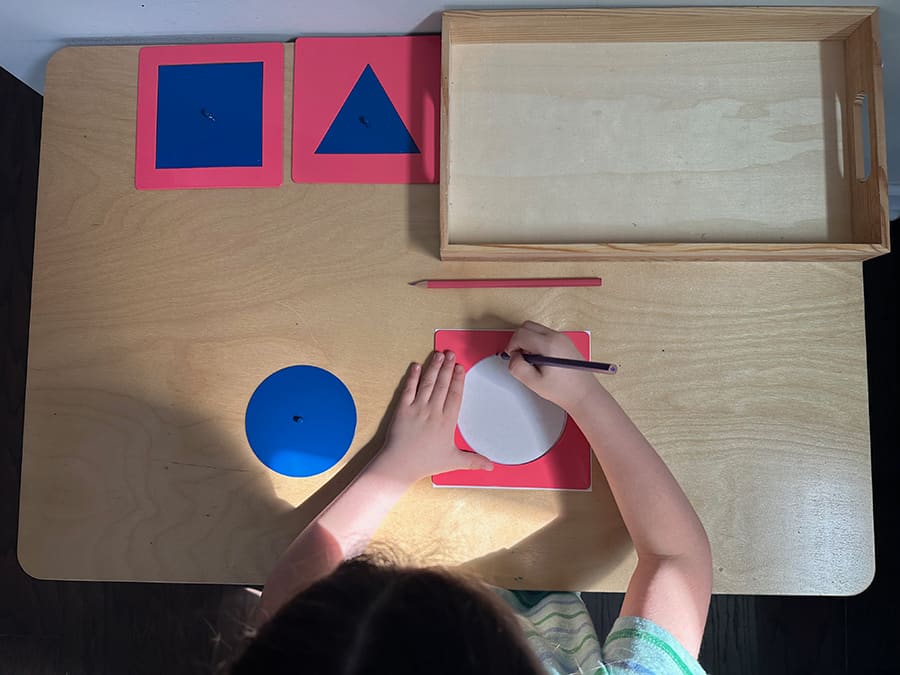
My five-year-old daughter, Annie, enjoyed tracing the metal shapes with the different colored pencils.
In this post, I’ll share the 11 metal inset lessons, including some advanced exercises I learned from my teacher training. I’ll also share some ideas and a printable if you don’t have the actual metal insets.
In This Post
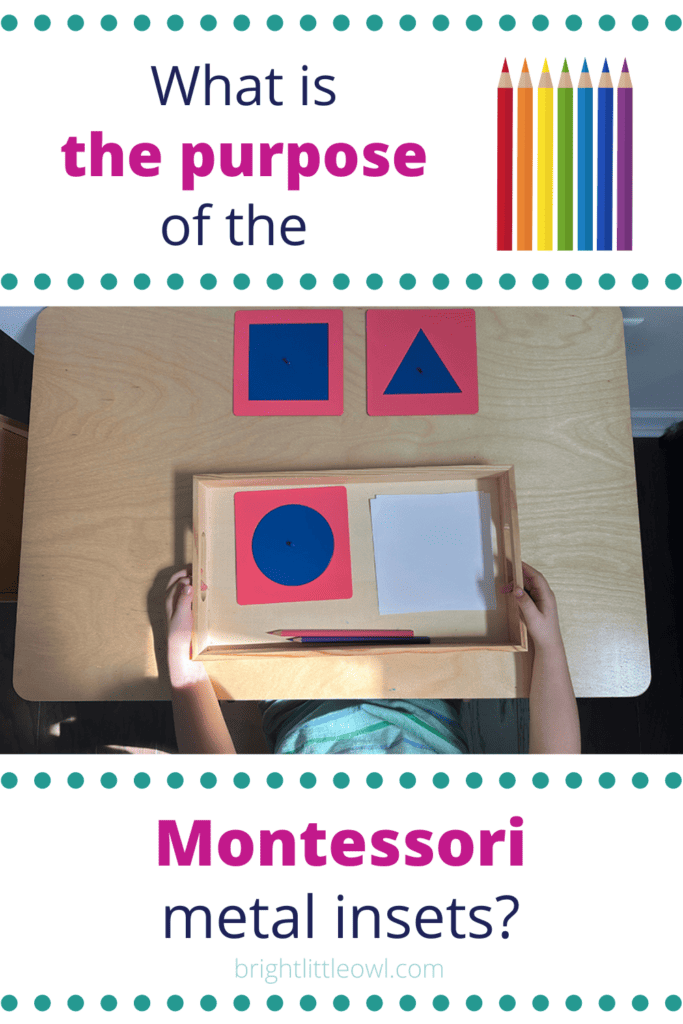
What is the purpose of the Montessori metal insets?
Handwriting is an overall important life skill for learning. According to the VeryWell Mind article, Writing by Hand Boosts Brain Activity and Fine Motor Skills, Study Shows:
"When hand writing, fine and precise hand movements are involved. These sensory experiences create contact between different parts of the brain and open it up for learning so that we both learn and remember better."
Working with the Montessori metal insets is a great way to set your child up for success, as it provides direct preparation for handwriting. Previously, your child may have worked on various pre-writing fine motor activities, such as practical life, hands-on sensorial activities, and art exploration.
The metal insets give practice in pencil control, grip, and a lightness of touch.
The fantastic thing about the set of the ten Montessori inset shapes is that all the strokes in the shapes are necessary to write the letters of the English alphabet.
It’s also important to remember that when tracing the insets, you trace in a counterclockwise motion to help prepare for handwriting.
The metal insets help young children:
prepare for handwriting
acquire the ability to trace
develop a light touch for using a pencil
practice correct posture for writing
strengthen fine motor coordination
explore grip and using a pencil
tracing the pink triangle frame metal inset
How to do the Metal Insets lessons
Montessori Metal Insets
What you will need
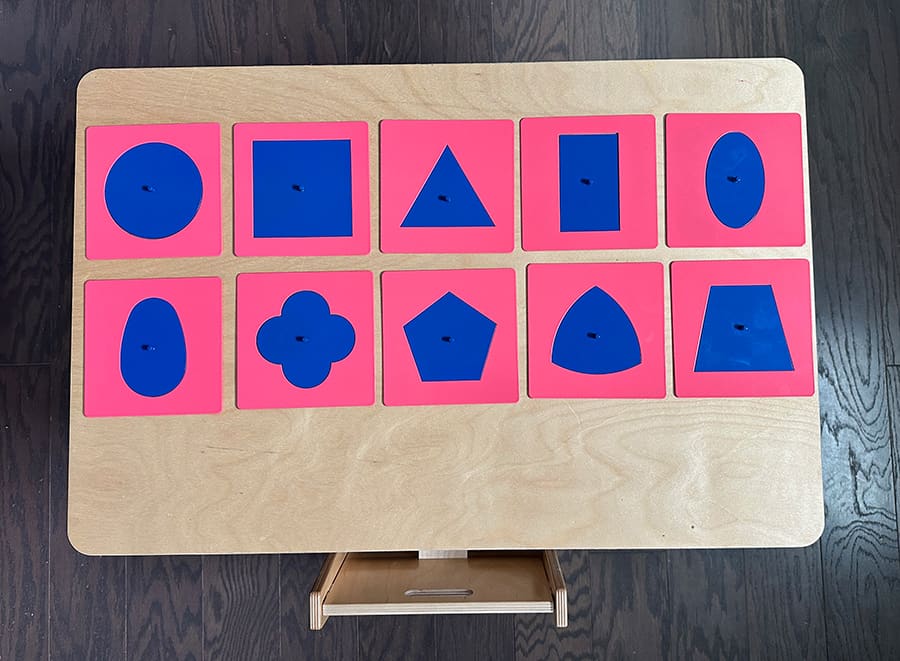
The Montessori metal insets remind me of those knobbed shape puzzles. They include ten metal frames in red or pink and ten corresponding metal insets in blue with a knob in the center, representing the following plane figures:
circle
square
triangle
rectangle
ellipse
oval
quatrefoil
pentagon
curvilinear triangle
trapezoid
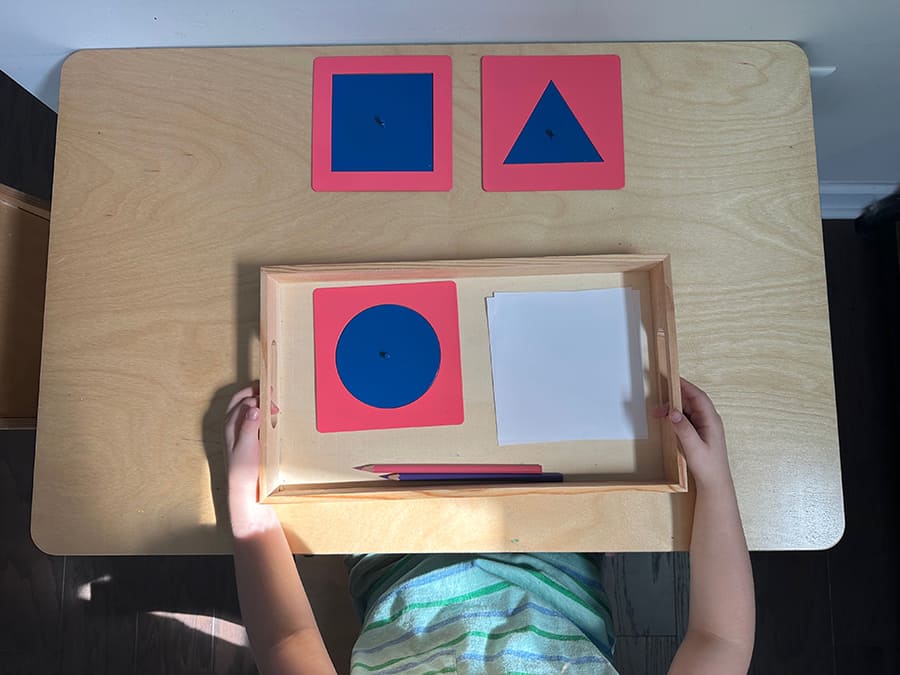
metal inset on a tray
You can also get two sloping stands for the insets and their frames to store them, as seen in Montessori classrooms.
A small tray
Paper – 5.5 x 5.5 inch squares
colored pencils
pencil holder with three grooves (optional)
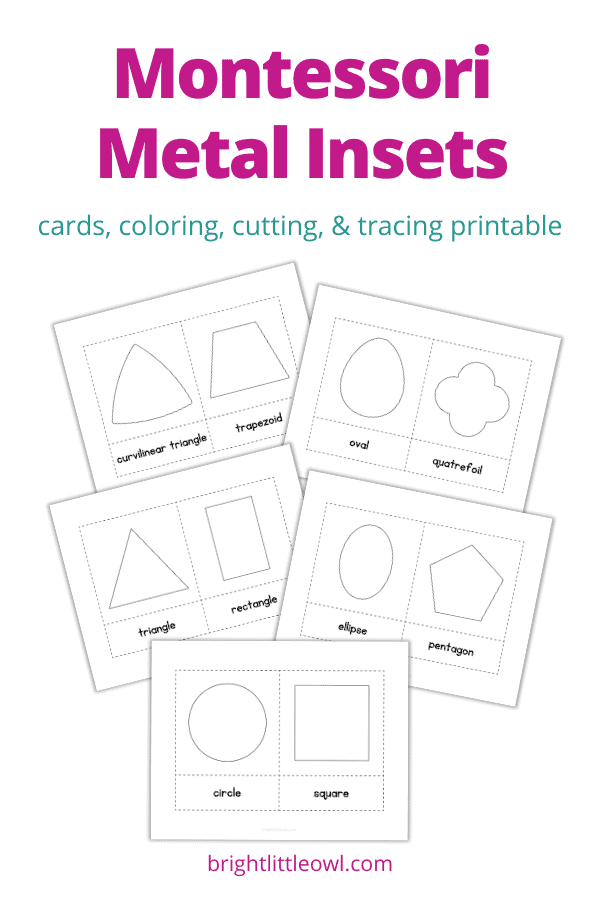
What if you don't have the metal insets?
If you do not have the metal insets, nor do you wish to purchase them (they are expensive), I created a printable download of the ten metal inset shapes. You can print them out and make stencils for tracing.
You can make DIY metal insets using these shape stencils on thick card stock or trace and cut them out on cardboard.
Also, at one time, I saw plastic versions of the Montessori metal insets on Amazon, which were much cheaper than the original metal ones. I have not seen them in stock recently, though.
Some Etsy sellers may have handmade wooden versions of them, which are less expensive than the metal ones.
Another idea is to find regular shape stencils. They won’t be the same as the Montessori insets, but you can still practice with them and similarly make designs!
* Sign up for the Resources Library at the bottom of this post if you’d like to download the metal insets printables I made. If you’re a subscriber, check my newest email for the updated password.
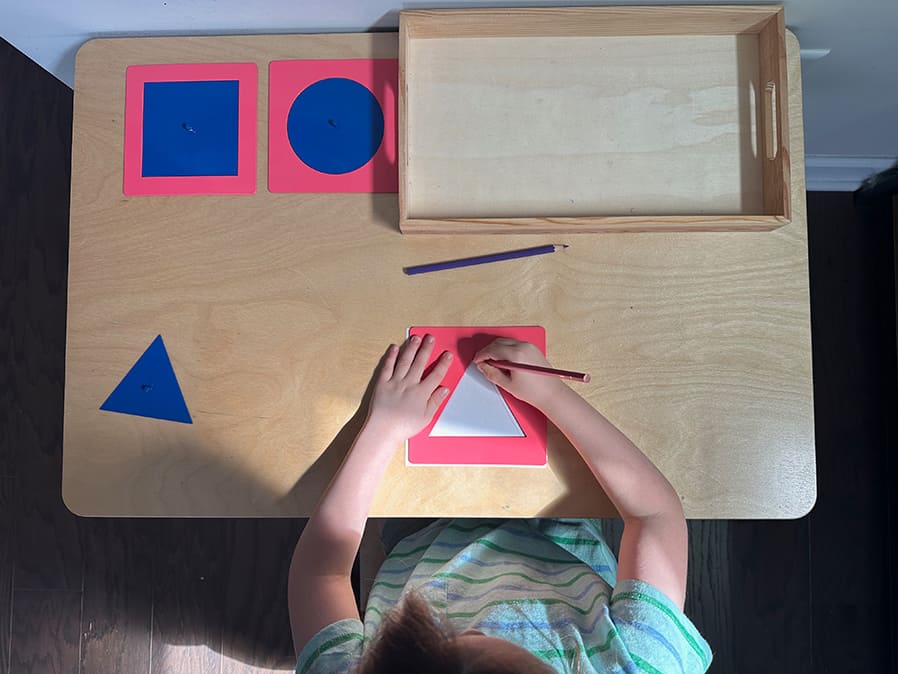
tracing the triangle inset
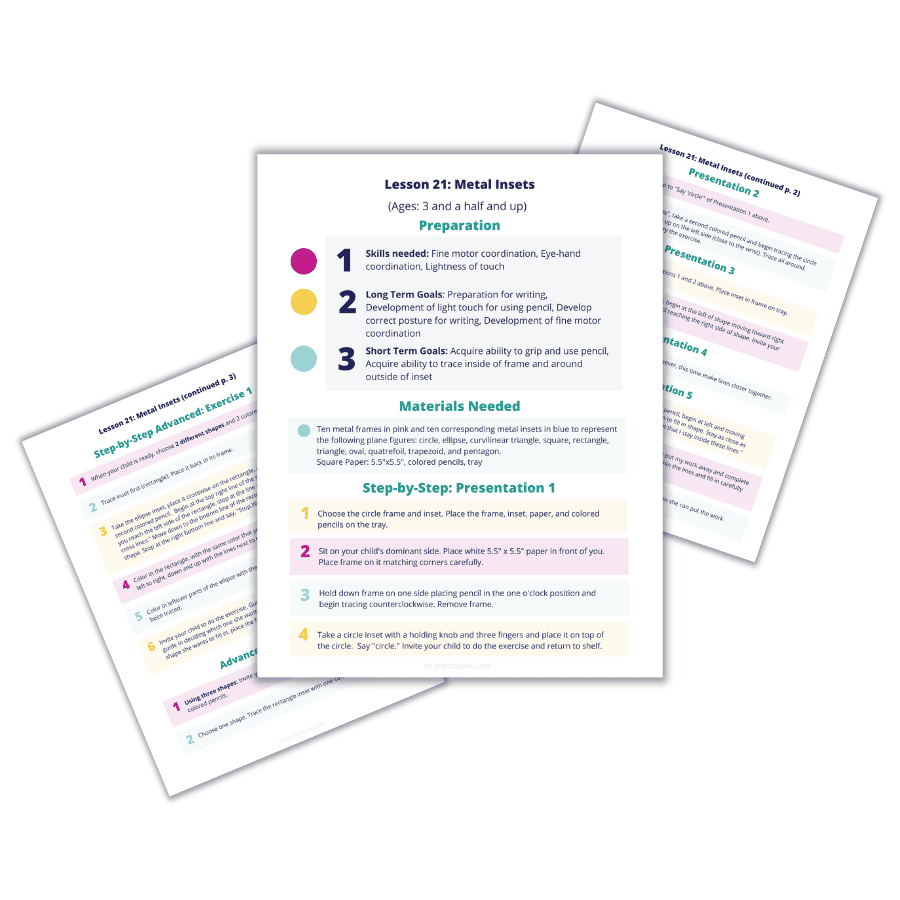
Step by step: The 11 presentations and exercises of the metal insets
The first 5 are beginning presentations
beginning presentations
Tip: If your child does not know how to hold a pencil, show her how. Some children may need a pencil gripper on their pencil.
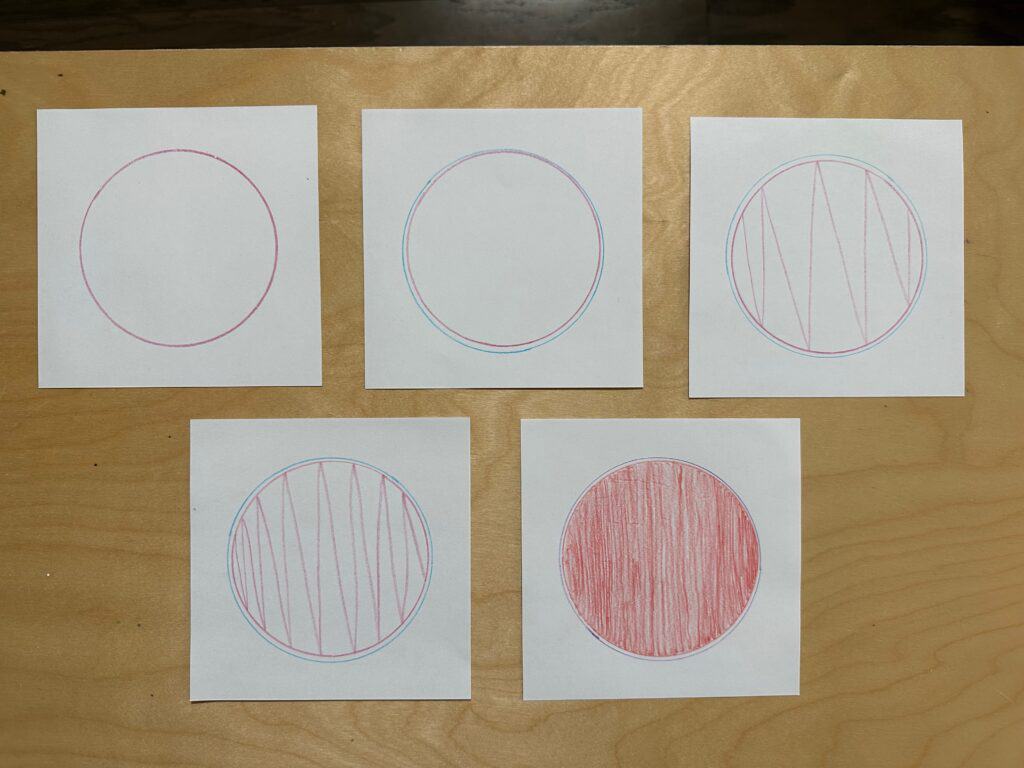
1. Trace frame only
trace frame only
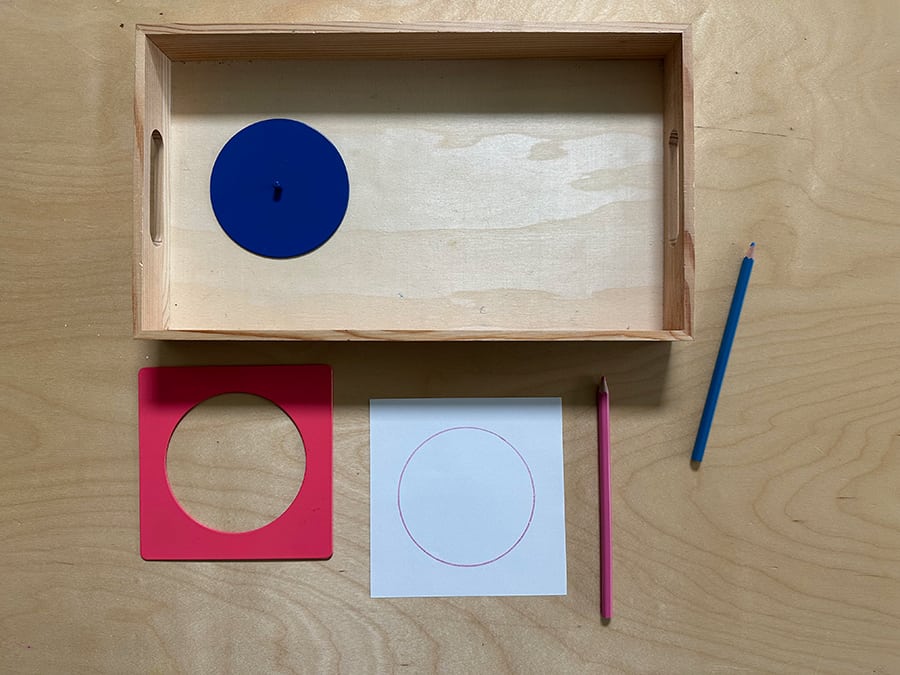
Choose the circle frame and inset. Place the frame, inset, paper, and colored pencils on the tray.
Sit on your child’s dominant side. Place white 5.5″ x 5.5″ paper in front of you. Place the frame on it, matching corners carefully.
Hold the frame on one side, place the pencil in the one o’clock position, and begin tracing counterclockwise. Remove frame.
Take a circle inset with a holding knob and three fingers and place it on top of the circle. Say “circle.” Invite your child to do the exercise and return to the shelf.
2. Trace frame and inset
trace frame and inset
Repeat steps up to “Say ‘circle'” of Presentation 1 above.
After you say “circle,” take a second colored pencil and trace the circle inset about an inch up on the left side (close to the wrist). Trace all around. Invite your child to try the exercise.
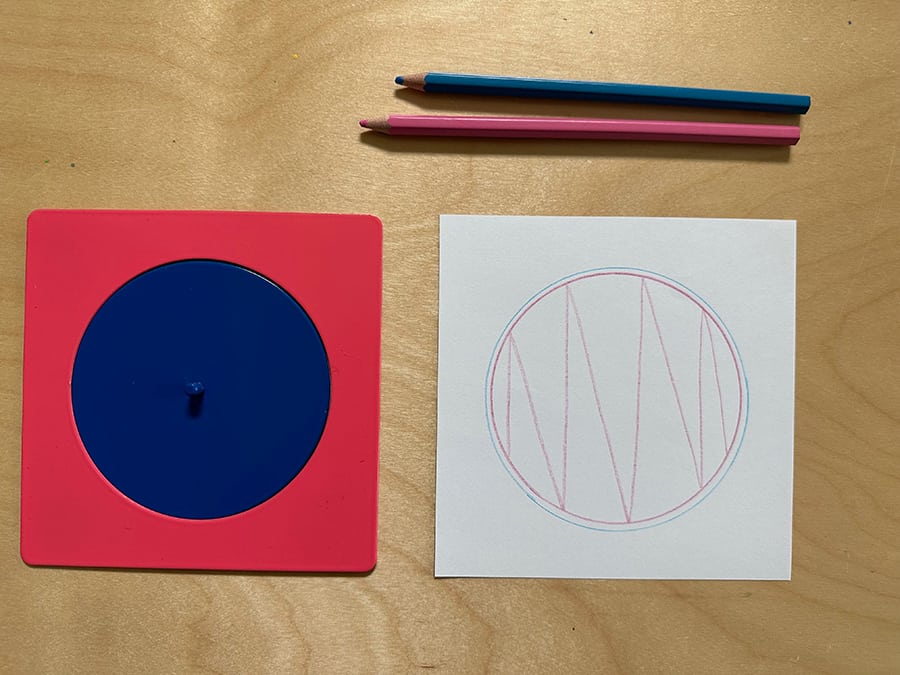
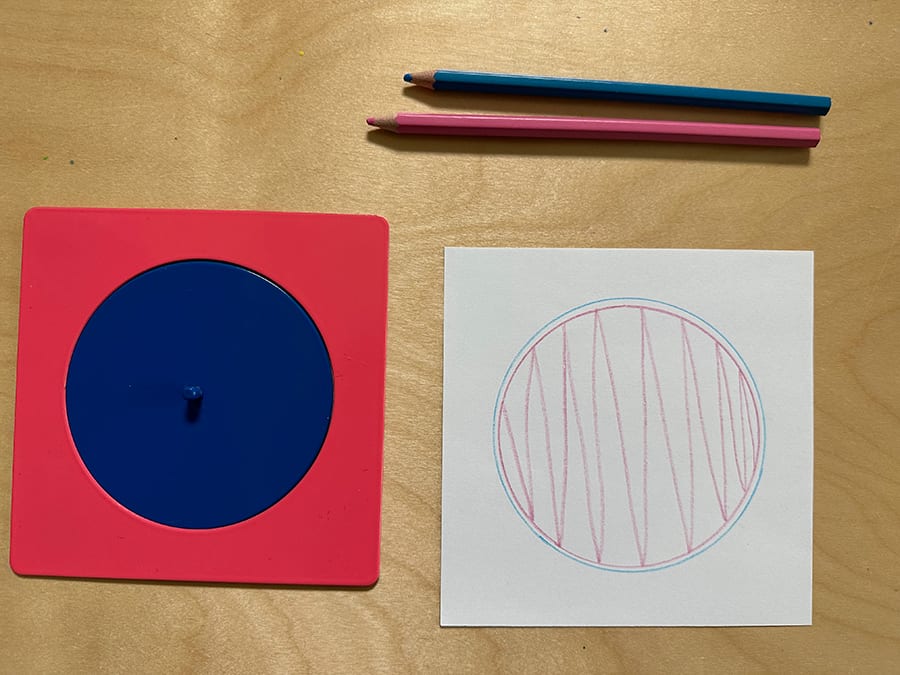
3. Trace frame, inset and draw lines
trace frame, inset and draw lines
Repeat steps of presentations 1 and 2 above. Place inset in the frame on the tray.
drawing lines in the shape
Using the first colored pencil, begin at the left of the shape, moving toward the right, going down, up, down, up until reaching the right side of the shape. Invite your child to try the exercise.
Be sure to stay in the lines.
4. Trace frame, inset and draw lines closer together
trace frame, inset, and draw lines closer together
Repeat steps of presentation 3. However, this time, make lines closer together.
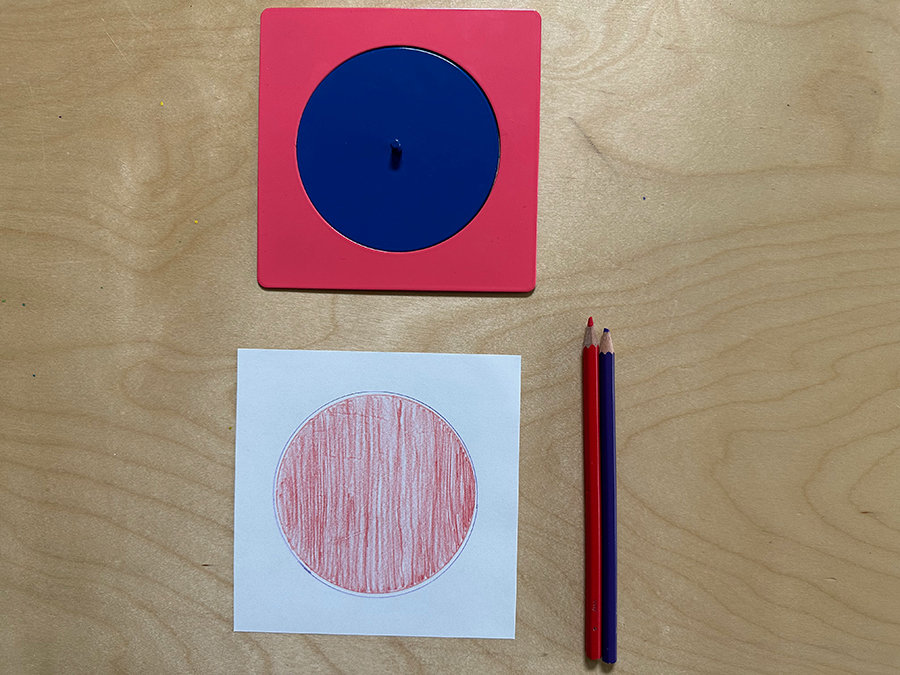
5. Trace frame, inset and color in shape
trace frame, inset, and color in shape
Repeat presentation 2. With the first colored pencil, begin at left and move towards right using a down-up motion to start to fill in the shape. Stay as close as possible in making lines. Say, “It is important that I stay inside these lines.”
After doing a small segment, indicate that I can put my work away and complete it another time. Staying within the lines and filling in carefully is more important than quickly and carelessly.
Invite your child to choose the work and tell her when she can put the work away and finish at another time.
Note: You’ll notice in the photo above that the circle has very stark vertical lines. While coloring in the shape, you will make deliberate and slow up-and-down movements very close together from top to bottom. The stroke lines will be very close together. It may take several sittings to finish the shape. Take breaks!
The next 6 exercises are more advanced
6 advanced exercises
Tip: Always fill in beginning left to right with a down and up motion.
Tip: If your child has trouble filling in, you may allow her to use a frame.
Tip: Each exercise is extended through many months. Your child should show readiness before being introduced to a new exercise.
6. Two shape design
two shape design
When your child is ready, choose two shapes from the Montessori metal insets and two colored pencils.
Trace the first inset (rectangle). Place it back in its frame.
Take the second inset (ellipse), place it crosswise on the rectangle, and trace it with a second colored pencil. Begin at the top right line of the rectangle. Start to trace.
When you reach the left side of the rectangle, stop at the line and say, “We must not cross lines.” Move down to the bottom line of the rectangle and finish the ellipse shape. Stop at the right bottom line and say, “Stop here. We must not cross lines.”
Color in the rectangle with the same color you traced—work from left to right, down and up with the lines next to each other.
Color in leftover parts of the ellipse with the same color that the ellipse had been traced.
Invite your child to do the exercise. Guide your child in placing insets and deciding which one she wants to fill in. If she has difficulty seeing the shape she wants to fill in, put the frame on top and ask if this is the one.
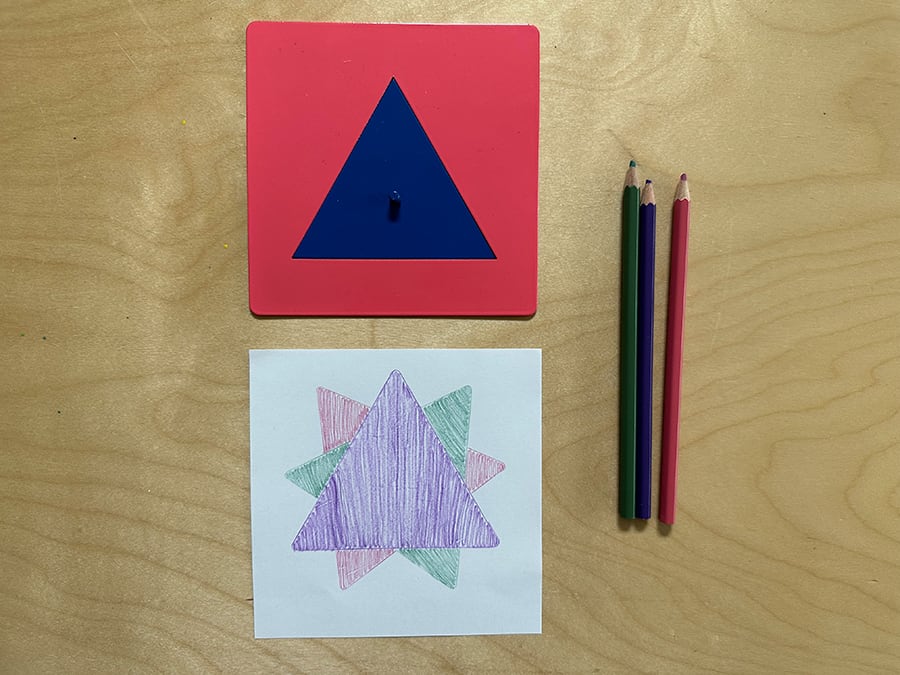
7. Three shape design
three shape design
Using three shapes: Invite your child to choose three metal insets and three colored pencils.
Choose one shape. Trace the ellipse inset with one color. Replace it.
Trace the trapezoid on top of the ellipse with the second color, remembering not to cross lines.
Trace the pentagon with the third colored pencil, again not crossing the line previously made.
Fill in one shape with a colored pencil. Place a frame on top to help visualize which you are with, filling in the shape.
Fill in left to right, then up and down slowly and carefully.
Note: Always fill in with the same colored pencil you traced with.
8. One shape in two positions
one shape in two positions
Use one inset in two different positions. You will use two pencils. This is done like an advanced exercise with two shapes (#6) above.
Trace the inset once. Remove the inset, and look at the shape drawn.
Replace the inset on the paper in a different position and use a second colored pencil without crossing lines.
Fill in one shape completely with one colored pencil. Fill in leftover parts with the other colored pencil. Invite your child to do the lesson.
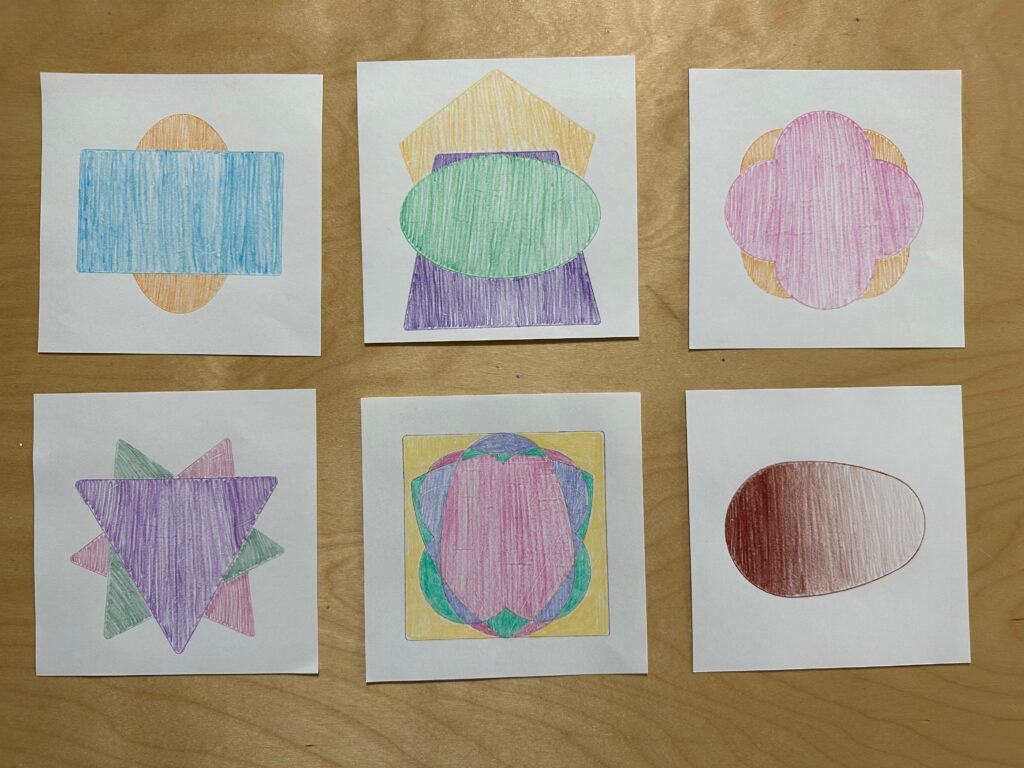
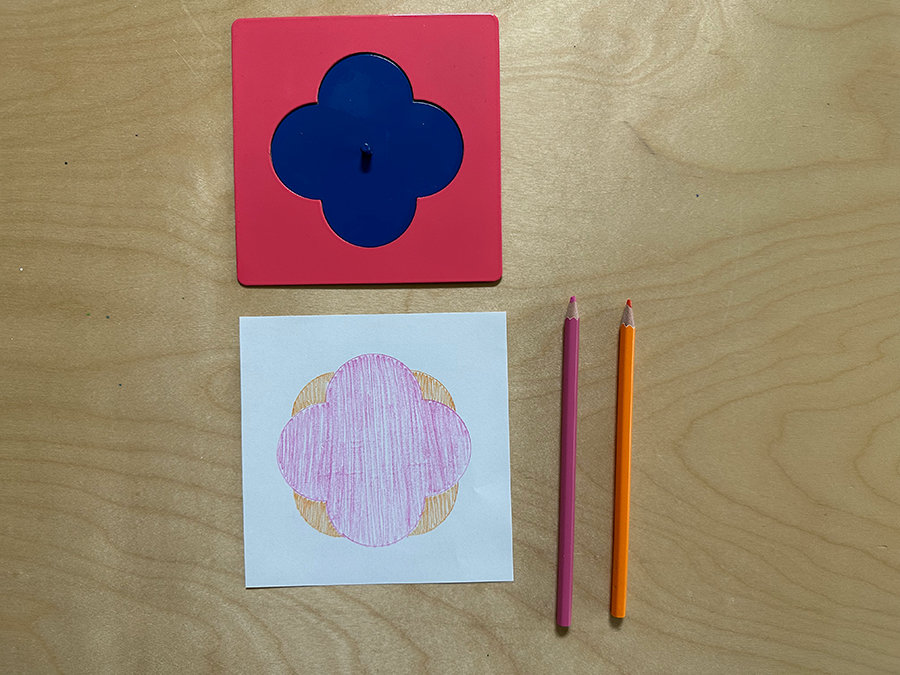
Note: The shape above is a quatrefoil. In the classroom, I found this is one of the kids’ favorite shapes because it looks like a flower!
9. One shape in three positions
one shape in three positions
Use one of the metal insets in three positions. Use three colored pencils.
Complete as in exercise #8 above, except use three positions.
If your child needs help to visualize the shape, use the frame.
Invite your child to do the lesson.
Variation: Use different colored paper.
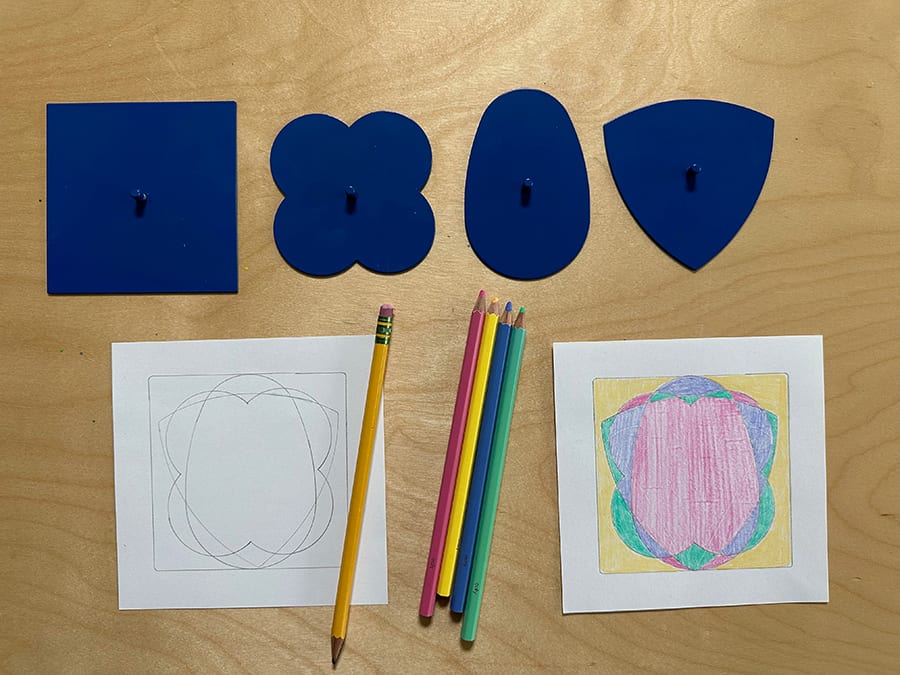
10. Four shape design
four shape design
Create a design with four metal insets. Choose white or colored paper.
First, trace the shapes using a regular (non-colored) pencil. Tell your child you are going to make a design. Choose four insets.
Arrange each inset the way you would like your design. Trace one at a time.
Choose 3-4 colored pencils. Color in whatever you choose.
Note: This exercise is so much fun! There are so many designs and patterns you can do with the shapes here. Have fun with it!
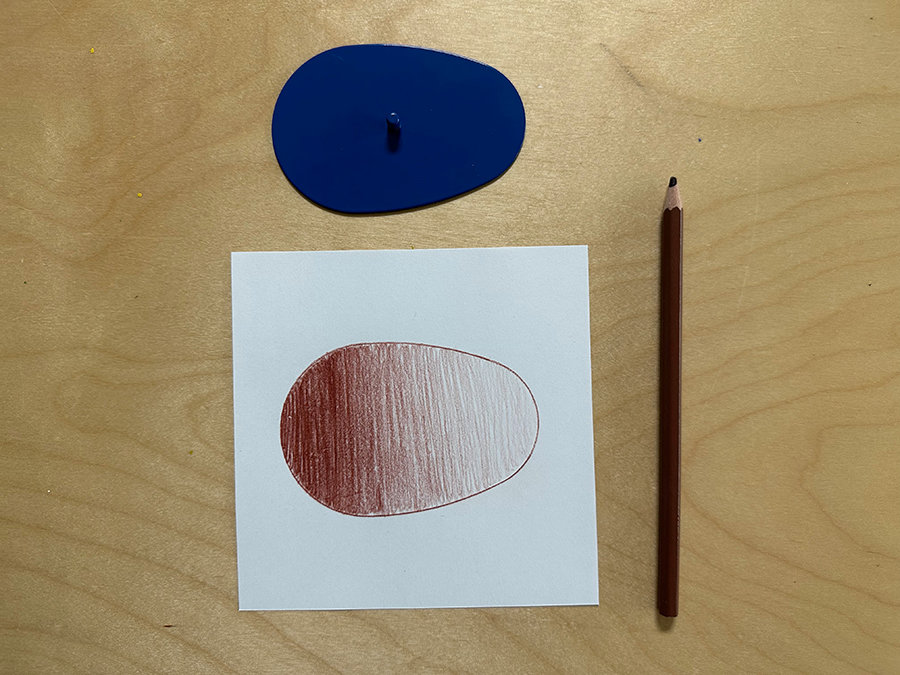
11. Shading with one shape
shading one shape
Shading: one inset, one colored pencil. Choose one inset and one colored pencil. Trace inset.
Begin filling in the shape from left to right and in up and down motion. Begin by pressing hard so that the coloring is very dark. Then, begin letting up so it gets progressively lighter.
exploring with the metal insets
Concluding Thoughts about the Montessori metal insets
As you can see, there is so much you can do with the metal inset material; the designs, ideas, and colors are endless!
It’s important to note that according to the Montessori method, the metal insets are not meant to draw specific pictures like a cat or a house.
But, there are many ways that you can make abstract shape designs and patterns with them instead. The more your child works with them, the more handwriting preparation she will experience.
Annie tried the beginning lessons with the frames and insets and enjoyed tracing the different shapes while trying different colored pencils. Coloring in is not her favorite thing at the moment. She prefers to draw her pictures and stories. But this will come with time.
I love the metal insets, and it was great to explore them again and create new designs. As an adult, I find the work an excellent mindfulness coloring activity. Be sure to take breaks to rest your fingers and hands!
If you can’t access the actual Montessori metal inset material, you can make your own stencils with the printable download I created (sign up for the Resources Library below).
Which metal inset shape or design is your favorite? Leave a comment below!
* Sign up for the Resources Library at the bottom of this post if you’d like to download the metal insets printables I made. If you’re a subscriber, check my newest email for the updated password.
After signing up for the resources library, there should have been a password in your email confirmation. Try putting in the password again and click on the resources tab again. Sometimes you have to click “resources” again. If you’re still having trouble, reply to my email, and I can walk you though it.
This is so interesting! Plus, it really gets kids to think creatively. My daughter is starting to homeschool her 4-year-old, so I’m passing this along!
I visited your blog post about Montessori metal insets, and I must say it’s a fantastic resource for parents and educators alike! The detailed explanation and the benefits of using metal insets in Montessori education are truly insightful. Thank you for sharing your knowledge and passion for Montessori learning!
Your post on Montessori metal insets is a valuable resource for parents and educators. It’s well-structured, explaining the purpose and providing clear steps for the 11 exercises. The inclusion of alternatives for those without insets is thoughtful. A helpful guide for promoting handwriting skills in young learners. 👏📝
Thanks for sharing these awesome writing strategies. I may not have a child to benefit from this strategy, however, I have a few sets of parents with little kids that would need this as a guide. I’ll forward this blog to them!
Nnniiccceeee….we are bound to get some very good shapes and designs from these insets. I’d like to see if the wooden insets get the job equally done as the metallic ones.
I love this! This is something we worked on with our kids before they started school, we would do work books and activities together to help get them prepared.


It appears that you know a lot about this topic. I expect to learn more from your upcoming updates.
I like the comprehensive information you provide in your blog. The topic is kinda complex but I’d have to say you nailed it!
Helo Sister, How can get the Metal Inset Pdf. I have sign in 🙂
Hi Yati,
After signing up for the resources library, there should have been a password in your email confirmation. Try putting in the password again and click on the resources tab again. Sometimes you have to click “resources” again. If you’re still having trouble, reply to my email, and I can walk you though it.
This is so interesting! Plus, it really gets kids to think creatively. My daughter is starting to homeschool her 4-year-old, so I’m passing this along!
I visited your blog post about Montessori metal insets, and I must say it’s a fantastic resource for parents and educators alike! The detailed explanation and the benefits of using metal insets in Montessori education are truly insightful. Thank you for sharing your knowledge and passion for Montessori learning!
Hi Kimberly,
I’m so glad that you enjoyed reading about the Montessori Metal Insets! It’s such a wonderful handwriting activity.
Your post on Montessori metal insets is a valuable resource for parents and educators. It’s well-structured, explaining the purpose and providing clear steps for the 11 exercises. The inclusion of alternatives for those without insets is thoughtful. A helpful guide for promoting handwriting skills in young learners. 👏📝
Hi Monidipa,
Thank you so much for your kind words! I’m happy you loved reading about the Montessori Metal Insets.
Thanks for sharing these awesome writing strategies. I may not have a child to benefit from this strategy, however, I have a few sets of parents with little kids that would need this as a guide. I’ll forward this blog to them!
Hi Blair,
Thank you for forwarding this to your friends with kids. I’m so glad you enjoyed reading about the Montessori metal insets and handwriting strategies.
This is a nice and very informative post! Such a handy tool thanks for sharing this with us
Love this! Helpful to ALL students including those with disabilities!
Hi Holly,
Yes, the Montessori Metal Insets are beneficial for everyone!
I love these strategies! This is so helpful for teachers like me.
Nnniiccceeee….we are bound to get some very good shapes and designs from these insets. I’d like to see if the wooden insets get the job equally done as the metallic ones.
I love this! This is something we worked on with our kids before they started school, we would do work books and activities together to help get them prepared.
I remember using something like this when I was a kid. Great ideas for keeping the kids busy with crafts.
I love these methods, and homeschool my kiddos. Will be utilizing this post! Thanks so much for sharing.
That’s a pretty neat set. I’ll have to look into this a bit more for my kiddos.
great and informative post. I haven’t heard of this till now. thanks for sharing
What a handy tool! I can really see how these metal insets help prepare kids for writing in so many ways. Great tip!